|
Goldenseal is estimating software which gives quick and accurate estimates for any type of
project.
Use Estimates to calculate the cost of projects that you will do-- either
for customers or for yourself.
Create an Estimate transaction whenever you want to create an estimate for a project- whether it is a "ballpark" rough
estimate, or a finished bid that you'll give to a client.
The Goldenseal estimation software is designed for construction, and any other business that
needs to create accurate estimates.
NOTE-- For cost estimates that you receive from suppliers or subcontractors, use a Bid or
a Purchase/Work Order.
ESTIMATE BASICS
When to Use Estimates | Estimate Basics | Estimate
Setup | Importing Estimates
Hints for MacNail Users | Hints for
BidMagic Users
| Estimating Software on Website
ESTIMATE DATA ENTRY
Entering Estimates | Data Fields | More
Info | Status
Field
Category Breakdowns | Item Breakdowns
Cost Areas | Entering Hard Costs | Entering Soft
Costs
| Cost Summary
ESTIMATE DIMENSIONS
Entering Dimensions | Calculated Dimensions | Changing
Locations
Entering Location Dimensions | Using Dimensions | Updating
Quantities
SCHEDULES and TAKEOFFS
Basic Schedules | Changing Item Dates | Adding Delays | Changing
Project Order
Showing Times | Schedule Calculations | Material Takeoffs
UNIT COSTS
Unit Cost Basics | Unit Cost Design Hints | Unit
Cost Setup
USING ESTIMATES
Updating Prices | Awarding Estimates | Creating
an Internal Budget
Changing an Awarded Estimate | Using Estimates | Fixing Mistakes
DIMENSIONS FOR SPECIFIC INDUSTRIES
Drywall/Plaster | Electrical | General Construction | Painting |
Plumbing
Printing | Property Maintenance | Siding/Stucco | Roofing
WORKING WITH ESTIMATE RECORDS
Entering Records | Changing Records | Deleting
Records | Voiding Records
Finding Records | Sorting Records | Scheduling WEBSITE INFO LINKS
Estimating Software | Construction
Estimating
Software | Cost Estimating Software
Project Estimating Software
RELATED TOPICS
Assemblies | Calibrating Prices | Cost Categories | Contracts | Cost
Items
Calculated Dimensions | Dimensions | Job Costs | Locations
Overhead | Projects
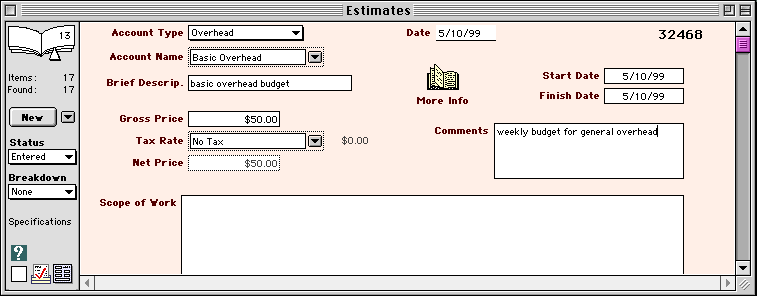
When to Use Estimates
Use an estimate to calculate the price for a project that you'll do for a client. The estimate
is a permanent record of the price quote, whether or not you actually do the work.
You can also use Estimates for work that you'll do for a customer sale, or you can enter a Sales transaction
instead, and give it Quote Only status. HINT-- Some people use the term Quote, Quotation, Bid, Proposal or Work Order for the estimates
that they give to customers. For consistency, we always call them Estimates, but you can use the Custom
Layouts command
to change the name on the printed forms that you give to customers.
You can also use Estimates as planning budgets for internal work, property maintenance or overhead.
Entering Estimates
To enter a simple Estimate, follow these steps:
- Choose Estimates from the Income menu.
- Click the New button, or choose New Record from the Edit menu.
- Enter details for the estimate.
 QUICK
SETUP HINT-- You only need to enter an Account Type, Account Name,
Brief Description and Gross Price. QUICK
SETUP HINT-- You only need to enter an Account Type, Account Name,
Brief Description and Gross Price.
Data Fields
Enter the following information for each Estimate: Account Type-- Enter the type of account to use for the estimate. For an estimate given to a possible customer, choose Prospect. For work that
you will do for a current customer, choose Customer. For a cost budget on your own work, choose Investment, Overhead, Real Estate.
Account Name-- Use the clairvoyant field to enter an account to use for the estimate or budget.
NOTE-- Only one cost budget can be used for each account. Accounts that already have an active estimate will not appear
in the list.
Brief Description-- type in a brief description of what's included in this estimate or budget.
Gross Price-- enter the price of the bid or quotation.
NOTE-- If you do a detailed breakdown, the price will be calculated for you, based on the sum of the costs of detailed items.
Tax Rate-- Use the clairvoyant field to select a sales tax rate.
NOTE-- If you use this estimate in a Project account, enter sales tax for the estimate or for
the project, but not both.
Tax Amount-- Goldenseal calculates the sales tax amount.
Net Price-- The total price, including sales tax, is calculated for you.
Specifications-- Type in a brief description of the project. For a small job this may be the only specifications of work you'll do.
Date-- when you create an estimate, today's date is entered automatically. You can type in a different date if needed.
Record Number-- Goldenseal assigns a record number.
Start Date-- Enter the date that you plan to start work on the project.
Finish Date-- Enter the date that you plan to complete work on the project.
NOTE-- If you use a breakdown, Goldenseal automatically computes the finish date when you click the Update Schedule button.
Comments-- Enter any comments you have about this estimate.
More Info
Click the More Info button to enter additional details for this estimate:
Project Info
Time Period-- If this estimate is a budget amount per time period, enter the period.
Project Size-- Enter the size of the project, in square feet or whatever other measurement is most appropriate
for this estimate.
Contract-- Goldenseal stores a link to the Contract which is used
for the project that uses this estimate.
Working Hours-- Enter the Working Hours that you will use when working
on this project.
Supervisor-- Enter the employee who is supervising this project.
Billing Setup
Terms-- Enter the Payment Terms to be used for this job. You can ignore this
item for a budget.
Message-- Use the clairvoyant field to select a Message to include on
estimate printed forms.
Sales Rep-- Choose the employee who will receive a commission for this
project, or who will be responsible for it. Only employees who have a commission rate will be available
as reps.
Job Cost Info
Category System-- Enter the Category System to use when itemizing this
estimate.
Location Package-- Enter the Location Package to use when itemizing
this estimate. Other Info
Job Type-- Use the clairvoyant field to enter a Job Type.
Prepared By-- Enter the employee who prepared this estimate.

Status Field
The status field shows the current state of the estimate:
Incomplete-- An estimate that has not yet been submitted. Prices
for incomplete estimates will be updated whenever supplier prices change.
Submitted-- An estimate that has been submitted to clients.
Pricing will no longer be updated.
Void-- An estimate that will not be done.
Awarded-- Assigned automatically when a project is created that
uses this estimate.
Completed-- The project has been completed.
Category Breakdowns
Use a Category breakdown to enter an itemized estimate, when you simply want to type in a description of the
work without using Cost
Items or Assemblies.
To enter a Category breakdown, click on the Breakdown popup (at the left side of the window) and choose Category.
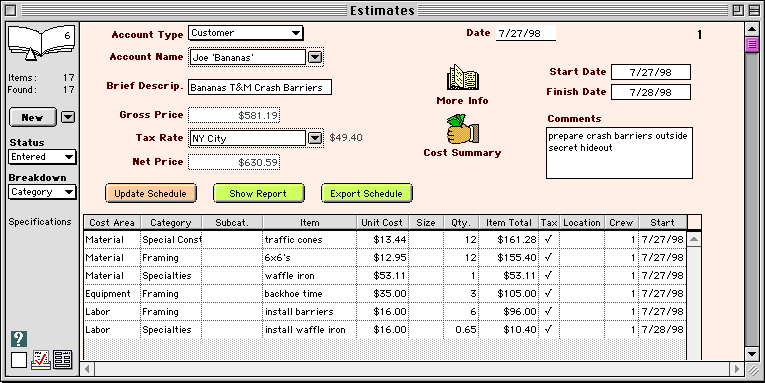
Enter the following information in each line of the breakdown table:
Cost Area-- Enter the basic type of work.
Category-- Enter the Cost Category under which you'd like to classify this item.
Subcategory-- If the Category System for this estimate has subcategories, enter one here.
Item-- Type in a brief description of this line item.
Unit Cost-- Type in the cost for one unit of this line item.
Size-- Type in the size of one unit.
Quantity-- Type in the quantity for this line item.
Item Total-- Goldenseal calculates the total cost of this line item (unit cost x quantity).
Tax-- Sales tax is applied to items with a check mark in this column.
Location-- Enter a cost Location for this item.
Crew-- Enter the crew size for this item, to calculate schedule timing.
Start-- When you click the Update Schedule button, Goldenseal calculates the date for work on this item. If you type in a new start date,
Goldenseal will automatically adjust the start date for all subsequent items. For more about schedules, click here.
To add a new line to the table, click in the bottom row and hit the Return key (Mac) or Enter key (Windows).
Item Breakdowns
Use an Item breakdown to enter an itemized estimate based on specific Cost Items or Assemblies.
To enter an Item breakdown, click on the Breakdown popup (at the left side of the window) and choose Item.
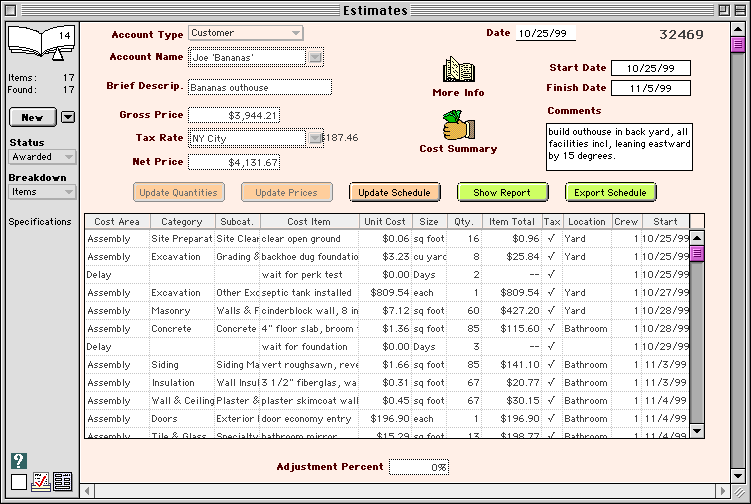
Enter the following information in each line of the breakdown table:
Cost Area-- Enter the basic type of work.
Category-- Enter the Cost Category under which you'd like to classify this item.
Subcategory-- If the Category System for this estimate has subcategories, enter one here.
Cost Item-- Choose a Cost Item or Assembly.
HINT-- If you choose an Unlisted item in the Cost Area, you can type in a new item here, just like in a Category breakdown.
Unit Cost-- Goldenseal fills in the cost per unit for the cost item.
Size-- Goldenseal fills in the unit size for the cost item.
Quantity-- Type in the quantity for this line item.
Item Total-- Goldenseal calculates the total cost of this line item (unit cost x quantity).
Tax-- Sales tax is applied to items with a check mark in this column.
Location-- Enter a cost Location for this item.
Crew-- Enter the size of crew that will work on this item.
Start-- When you click the Update Schedule button, Goldenseal calculates the date for work on this item. If you type in a new start date,
Goldenseal will automatically adjust the start date for all subsequent items. For more about schedules, click here.
To add a new line to the table, click in the bottom row and hit the Return key (Mac) or Enter key (Windows).
Cost Areas
Enter any of the following general Cost Areas into estimate breakdown tables:
Assembly-- a combination of labor, materials and other items from an Assembly (Item breakdowns only)
Equipment-- expenses from Equipment Hours
Labor-- expenses from Labor Hours
Materials-- expenses that come from a Material Purchase or Inventory Used
Subcontractors-- expenses from Subcontractor Costs
Other Costs-- expenses from Other Costs
You can also use the following more specialized cost areas:
Allowance-- a cost specified in an Allowance
Assembly Labor-- just the labor cost from an Assembly
Assembly Material-- just the material cost from an Assembly
Bid-- a price quote specified in a Bid
Commission-- commissions that you pay to an Employee
Contingency-- additional costs
Delivery Charge-- additional charges for shipping or delivery
Overhead-- an allocation to cover general overhead expenses.
Profit-- an allocation for your profit on this estimate.
HINT-- If you want to calculate overhead or profit as a percentage, use Percent of Hard Costs or Percent of Total
as a cost area, and type "overhead" or "profit" into the Cost Item column.
Percent of Hard Costs-- an additional cost which is a percentage of the hard costs in the estimate.
Percent of Labor-- an additional cost which is a percentage of the labor costs in the estimate.
Percent of Material-- an additional cost which is a percentage of the material costs in the estimate.
Percent of Total-- an additional cost which is a percentage of the total estimate cost.
PO & WO-- a reference to a Purchase/Work Order.
Reminder-- project reminders that you'd like to include for this job
Soft Cost-- an additional charge that you'll classify as an indirect cost
Tool-- tools that you'd like to include
Unlisted Equipment-- equipment costs that you type in on the fly (Item breakdowns only)
Unlisted Labor-- labor costs that you type in on the fly (Item breakdowns only)
Unlisted Materials-- materials that you type in on the fly (Item breakdowns only)
Unlisted Subcontractors-- subcontractor costs that you type in on the fly (Item breakdowns only)
Unlisted Other Costs-- other costs that you type in on the fly (Item breakdowns only)
Entering Dimensions
Goldenseal includes optional Dimension layouts, which allow you to enter basic measurements that will
determine the quantities of each item you include
in the estimate. The dimension layouts that you see depends
on the starter file that you began
with.
HINT-- If you don't start with a starter file, you won't see any dimensions! If
you've already entered data into a new file, you can import dimensions from one of the starter files.
Entering Dimension Measurements
To enter estimate dimensions, follow these steps:
- Choose Estimate Dimensions from the Options menu, and choose the first submenu.
- You will see a dimension layout where you can enter measurements.
- Fill in numbers. For more about specific dimension layouts, click here.
- Repeat steps 1 to 3 for each dimension layout in the menu.
HINT-- To switch dimension layouts, you can
also click on the Form button at lower
left.
Using Dimensions
When you are finished entering dimensions, follow these steps:
- Choose Estimate Dimensions from the Options menu, and choose Specifications.
- If you don't already have an Item breakdown, click on the breakdown popup and choose Items.
- Fill in items in the breakdown table.
- When you enter each item, Goldenseal will fill in the suggested quantity for it.
- To update existing items, click the Update Quantities button.
HINT-- To switch out of dimensions, you can
also click on the Form button at lower
left and choose Long Form.
Specific Dimensions
For more details about the dimension setups that come with Goldenseal,
click one of these links:
Drywall/Plaster | Electrical | General Construction | Painting | Plumbing
Printing | Siding/Stucco | Roofing
Calculated Dimensions
Some dimension quantities are calculated from other dimensions.
Calculated dimension fields have a padlock to the right of the number field.
When the padlock is locked, the calculated field is automatically updated whenever there is a change in a field whose value it uses.
When the padlock is unlocked, you can type in a value for the field. This value of an unlocked field will stay the same, even if there is a change
in other fields.
To switch the padlock, click on it. It will switch between locked and unlocked status.
NOTE: Some calculated fields are always locked. Those fields have a gray padlock which cannot be unlocked. To set a calculated dimension so it
can be unlocked, change the Calculated Dimension.
Entering Locations
If you've set up a layout for Location
Dimensions, you can enter as many locations as you need for each estimate.
To do so, follow these steps:
- Choose Estimates from the Income menu, and select an estimate.
- Choose Estimate Locations from the Options menu, and choose New Location from the submenu.
- Type in a name for the location, then click OK.
- Repeat the previous step for each location in the estimate.
Entering Location Dimensions
To enter dimensions for a specific location, choose Estimate
Locations
from the Options menu, and choose one of the locations from the bottom
of the menu. You can also click on the Form
Type button at the lower left corner to switch to a location. You'll see a dimension layout where you can enter measurements for this location.
Using Dimensions
Estimate dimensions are used as a suggested quantity for the quantity of cost items that are included
n an estimate. The dimensions are applied to the
estimate when you add items to an Item breakdown.
To start entering specific items after you've entered dimensions, click on the Form Type button at the lower left
corner, and choose Long Form.
To set the suggested quantity for your unit costs, open an Assembly or Cost Item and enter a dimension
into the Suggested Quantity field.
Updating Quantities
If you've changed dimensions and want to update the quantity for items
that you have already entered, follow these steps:
- Click on the Form Type button at the lower left corner, and choose Long Form.
- Click the Update Quantities button.
- It will recalculate quantities for each item in the Item breakdown.
Entering Hard Costs
Hard costs are the actual labor and material items that you include in
an estimate. To enter hard costs in an estimate with a Category breakdown, follow these steps:
- Choose Estimates from the Income menu, and locate an estimate. If it doesn't already have a Category breakdown, enter Category into the breakdown
field.
- Click in the Cost Area column in the first row of the breakdown table. Enter the type of cost you'd like to include. Most costs are Equipment,
Labor, Materials, Subcontractor or Other.
- Click in the Category column and enter a category.
- Click in the Item column, and type in a brief description.
- Click in the Unit Cost column, and enter the cost for one item.
- Click in the Quantity column, and enter the number of items to include.
- To add more hard costs, hit the Return key to add a row, and repeat steps 2 to 6 for each row.
To enter hard costs in an estimate with an Item breakdown, follow these steps:
- Choose Estimates from the Income menu, and locate an estimate. If it doesn't already have an Item breakdown, enter Items into the breakdown
field.
- Click in the Cost Area column in the first row of the breakdown table. Usually you'll use an Assembly, but you can also enter other types of costs.
- Click in the Category column and enter a category.
- Click in the Item column, and start typing an item name. Goldenseal will fill in the menu with possible choices. You can also click
on the popup button and choose an item.
- Goldenseal automatically fills in the cost for this item.
- Click in the Quantity column, and enter the number of items to include.
- To add more hard costs, hit the Return key to add a row, and repeat steps 2 to 6 for each row.
Entering Soft Costs
Soft costs are items that you add to an estimate to cover intangible costs
other than actual work done on a project. Soft costs can include
overhead, profit, contingencies, commissions and similar items. To enter soft costs into an estimate as percentage, follow these steps:
- Click in the Cost Area column in the first row of the breakdown table. Choose Percent of Hard, Percent of Total,
Percent of Labor, Percent of Materials or one of the other percentages.
- Click in the Category column and enter a category (optional). For example, you can enter Overhead, Profit or Contingencies
as a cost category.
- Click in the Item column, and type in a brief description for this item.
- Click in the Quantity column, and enter the percentage you'd like to add.
- To add more soft costs, hit the Return key to add a row, and repeat steps 1 to 4 for each row.
To enter soft costs as a fixed dollar amount, follow these steps:
- Click in the Cost Area column in the first row of the breakdown table. Choose Contingency, Overhead or Profit
to type in a money amount.
- Click in the Category column and enter a category (optional).
- Click in the Item column, and type in a brief description for this item.
- Click in the Unit Cost column, and enter the amount you'd like to add.
- Click in the Quantity column, and enter 1.
- To add more soft costs, hit the Return key to add a row, and repeat steps 1 to 5 for each row.
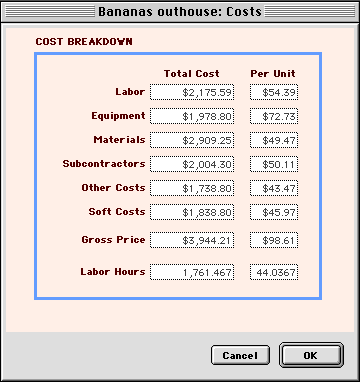
Viewing a Cost Summary
Click the Cost Summary button to see a breakdown of costs for labor, materials, subcontractors and other
components. You can see the overall cost, plus a cost per unit.
HINT-- The cost summary is a useful "double check" to make sure your estimate is accurate. It can
also help you compare different project costs, so you can develop "rule of thumb" costs for ballpark estimating.
Updating Estimate Prices
When you create an estimate with Item breakdowns, Goldenseal enters
the
current unit prices for Cost Items and Assemblies. The entered unit
prices will stay the same in the estimate, even if they
change in the Cost Items or Assemblies. To update unit prices in an Estimate that has not yet been awarded, click the Update Prices button, and Goldenseal will enter the most recent unit prices.
WARNING-- After you update prices, there is no easy way to go back to the older pricing.
If you need access to the old prices, make a duplicate of the estimate record, and change prices in the duplicate
copy.
Awarding Estimates
To award an Estimate that has been accepted by a customer, follow these
steps:
- Choose Projects from the Accounts menu.
- Click the New button, or choose New Record from the Edit menu.
- Enter the customer's name into the Customer field.
- Enter the estimate into the Estimate field.
- Enter any other information about the Project.
Once an estimate has been awarded, it is "locked" and you can no longer
make changes to it that affect its price.
If you do need to change the price on an awarded project, use a Change Order, or follow these steps to change the estimate
itself:
- Open the Project account that uses this estimate.
- Remove the estimate from the Estimate field, and hit the Enter key to save the project.
- The estimate record will now be editable. Make any changes. Hit the Enter key to save changes.
- Re-enter the estimate into the Estimate field in the Project.
Turning an Estimate into a Internal Budget
When you start work on an internal project for
your company, follow these
steps:
- Choose Projects from the Accounts menu.
- Click the New button, or choose New Record from the Edit menu.
- In the Customer Type field, enter Overhead for a general project. Enter Real Estate or Equipment if you are doing work on one of those assets.
- Enter a specific account into the Customer field.
- Enter the estimate into the Estimate field.
- Enter any other information about the project.
Changing an Awarded Estimate
When you assign an Estimate to a Project account, Goldenseal will change its
status to Awarded, and you will not be able to change its amount or breakdown items. To enter changes after the project has started, use Change Orders.
If you are sure you want to change the original estimate and haven't started project billing, follow these steps:
- Open the Project account that uses the estimate.
- Click on the popup button next to the Estimate field, and choose None from the bottom of the menu.
- Click the Enter key.
- Goldenseal will unlock the estimate, and you'll be able to change it.
- When you are finished making changes, go back to the Project account and award the estimate again.
Scheduling
Goldenseal includes a simple 'time line' schedule as part of an Item breakdown. It
automatically calculates how long it takes to finish each breakdown item that is an allowance, assembly, bid, labor or
unlisted labor. To calculate a project schedule, follow these steps:
- Enter assemblies and other components in an estimate with an item breakdown.
- Enter the number of people working on each item into the Crew Size column of the breakdown table.
- Enter the date the project will start into the Start Date field.
- Enter the Working Hours into the Working Hours field.
- Click the Update Schedule button. Goldenseal will automatically compute the start date for each item in the estimate.
To view or print a schedule report, choose Estimates from the Reports menu,
and choose Schedule from the submenu.
Changing Item Dates
To change the starting date for any item, type in
a different date. Goldenseal will automatically adjust the start date for all subsequent
items. WARNING-- If you click the Update Schedule button or change any item above the changed item, Goldenseal will return the
item's start date to a calculated value. To make a permanent adjustment, add a delay.
Adding Delays
To insert an expected delay in this project, follow these steps:
- Click in the last row of the breakdown table. You may need to scroll down to see the last row.
- Type the Return key to add a new row.
- Enter Delay into the Cost Area column.
- Enter a brief description of the delay in the Cost Item column.
- Enter Hour or Day into the Unit Size column.
- Enter the amount of delay into the Quantity column.
- Move the delay to the place where you'd like it to occur (see the next section).
Changing Project Order
To change the chronological order of items in an estimate breakdown,
follow these steps:
- Hold down the Command key (Macintosh) or the Control key (Windows) on your keyboard.
- Click on the row whose order you'd like to change.
- Hold down the mouse button, and drag the item up or down.
- When you reach its new location, lift up the mouse button.
- Repeat steps 1 to 4 for each other item you'd like to move.
- When you are finished, click the Update Schedule button. Goldenseal will compute new start dates for each item.
Showing Schedule Times and Completion Dates
To display the start time, completion date or completion
time for line
items in an estimate, follow these steps:
- Choose Custom Layouts from the Options menu, and choose Transactions from the submenu.
- Enter Estimates into the Transaction popup at upper left.
- Enter Items into the Breakdown popup at upper left.
- Click on the breakdown table.
- Choose Add Column to Table from the Edit menu.
- In the list of table fields, choose Start Time, End Time or End Date.
- Goldenseal will add the new column at the far right side of the breakdown table.
How Goldenseal Calculates Schedules
When you enter an Allowance or Bid as a line item in an estimate, Goldenseal
automatically includes the number
of labor hours from that item.When you enter an Assembly, Goldenseal calculates the number of labor hours for the item (based on the labor components in
the Assembly).
When you enter a labor Cost Item or unallocated labor, Goldenseal includes the number of labor hours that you entered.
If the estimate includes Working Hours, the schedule is based on the actual working hours and work days. Goldenseal
skips holidays, and adjusts all schedule dates by the delay factor.
If there is no Working Hours entry, the schedule is based on a 40 hour week, spread out over the entire week.
Material Takeoffs
Goldenseal makes it easy to see a list of materials that you'll use for
work on a project (called a material takeoff or a bill of materials).
To create a bill of materials report, follow these steps:
- Create an estimate for the project, and use an item breakdown for the estimate.
- Enter Assemblies and Cost Items for the work you'll be including in the estimate.
- When you are ready to purchase materials, choose Estimates from the Reports
menu, and choose Material Takeoffs from the submenu (the command is Bill
of Materials starting in Goldenseal 2.6).
- Enter the estimate, then click the Update button.
- You'll see a list of materials for the project.
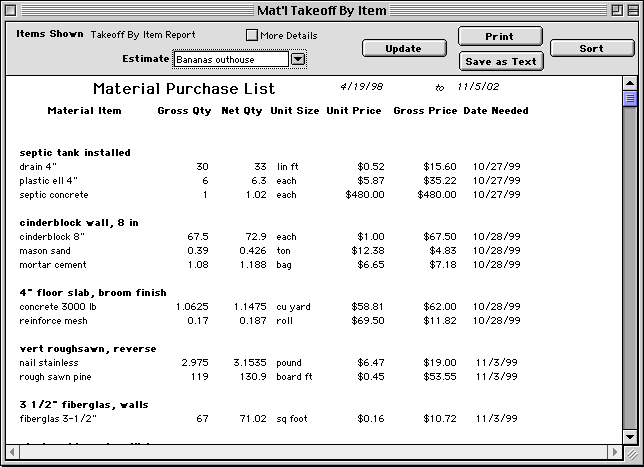
The Material Takeoff/Bill of Materials report shows a list of all materials needed for the project.
You can also get a Material
Takeoff By Item/Bill of Materials by Task report that shows all materials, grouped by line items from the
estimate.
HINT-- It's often useful to print both reports. Use the Material Takeoff report when
ordering materials for the project as a whole, and use the Takeoff By Item report when allocating materials to specific
areas of work.
The Gross Quantity is the calculated quantity with no waste added. The Net Quantity includes waste. The report shows the unit price that
was used in the estimate-- your actual purchase price may vary.
Goldenseal calculates material take-off quantities by multiplying the quantities in the item breakdown by the quantity
of each component in the Assemblies that are included in the breakdown.
If you enter a date range into the report window, Goldenseal will only list materials needed during that date range. Goldenseal uses the schedule
dates to determine when each material is needed.
Importing Estimates
Goldenseal includes an import command, so you can import estimates prepared
by MacNail Estimating or BidMagic (two older construction estimating
programs from Turtle Creek).
To import an estimate, follow these steps:
- Export the estimate from MacNail Estimating or BidMagic. Instructions for exporting are found in a separate document on the Goldenseal CD.
- Open a Goldenseal company file.
- Choose Import from the File menu, then choose Estimates from the submenu.
- Locate the export file that you created in step 1.
- Goldenseal will automatically create an estimate transaction that contains details from the original estimate.
Using Estimates
Create an Estimate transaction any time you give someone a price quote
for work you will do or items you will provide. If the estimate results in a project that you will do, create a Project account, and enter the estimate into the Estimate
field. Goldenseal uses the estimate price in the project, and marks the estimate as Awarded.
If the estimate is not needed, change its status to Void.

Main Page | Accounts |
Lists | Transactions | Menus |
Index | Website | User Page
|


