|
Use an Employee Account for each person who is on your payroll.
HINT-- The Goldenseal accounting software uses Employee accounts for payroll, job costing, time tracking and
time billing.
WORKING WITH EMPLOYEES
When to Use Employee Accounts | Terminating Employees
Sales Reps | Using Employee Accounts
ENTERING EMPLOYEE DATA
Creating Employee Accounts | Data Fields | Additional Payroll
Details
Contact Info |
Calculated Fields | Status Field | Withholding
Setup
EMPLOYEE RECORDS
Entering Records | Changing Records | Deleting
Records | Voiding Records
Finding Records | Sorting Records | Fixing Mistakes
WEBSITE INFO LINKS
Payroll Software | Payroll
Accounting Software | Time Billing Software | Time Tracking Software
RELATED TOPICS
Benefit Items | Benefit Packages | Commissions | Payroll
Records
Tax Items | Tax Packages | Vacation Items | Vacation
Packages
Wage Schedules | Writing Payroll
When to Use Employee Accounts
Set up an Employee account for each of your employees.
Consider any of the following as employees:
- Hourly workers.
- Workers who are on salary.
- Owners, partners or officers (even if not on salary).
- Unpaid volunteers or family members whose time you'd like to track
HINT-- If you consider someone as a subcontractor
for tax purposes, pay them through a Subcontractor account instead.
Creating Employee Accounts
To create a new Employee account, follow these steps:
- Choose Employees from the Accounts menu.
- Choose New Record from the Edit menu, or click the New button.
- Fill out information about the account.
 QUICK
SETUP HINT-- You only need to enter an Account Name. For time
and materials billing, enter a Billing Rate. For job costs, enter
a Job Cost Rate and Category System. For payroll, enter Wage Schedule,
Benefit Package, Tax Package, Marital Status, and exemptions. QUICK
SETUP HINT-- You only need to enter an Account Name. For time
and materials billing, enter a Billing Rate. For job costs, enter
a Job Cost Rate and Category System. For payroll, enter Wage Schedule,
Benefit Package, Tax Package, Marital Status, and exemptions.

Data Fields
For each Employee account, enter the following information:
Account Name-- Enter a short name for the employee. This is the text that will be displayed in the Chart of Accounts, and in pop-up menus.
Job Title-- If the employee has a job title, enter it here.
Full Name-- Enter the complete name for the employee. This is the text that will be written on checks, W-2 forms and other printed documents.
Hiring Date-- Enter the date the employee was first hired.
Termination Date-- If the employee has been terminated, enter the last date that they worked.
Wage Schedule-- Choose the Wage Schedule that this employee receives. If
the employee gets more than one wage rate, enter the wage schedule that you use most often for them.
Wage Amount-- If you use a wage schedule that uses a variable amount, type in the amount that is paid to this
employee.
Comments-- Type in any comments you have about this employee. You can enter key words here, to
make it possible to find groups of employees.
Entered-- The date that the account was created is entered automatically. You may change this date so it will appear in different order, when
the Chart of Accounts is viewed by date.
Record Number-- An record number is automatically assigned to the account.
Cost Type-- Use the pop-up menu to classify the employee into a cost type, if desired.
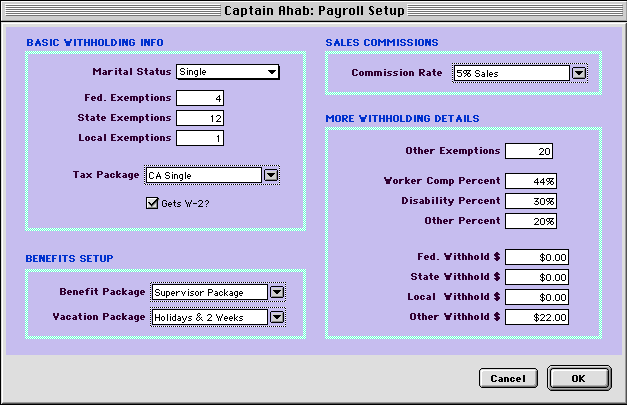
Payroll Setup-- Click the Payroll Setup button to enter payroll info for this employee.
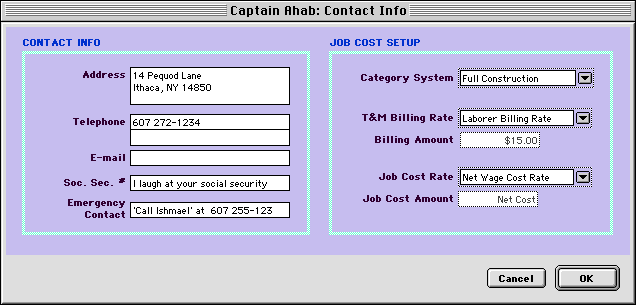
Contact Info-- Click
the Contact Info button to enter address and job cost info for this employee.
Additional Payroll Details
Click the Payroll Setup button to enter payroll info for this employee:
Basic Withholding Info
Marital Status-- Enter the marital status this employee uses for tax withholding.
Federal Exemptions-- Enter the number of exemptions to use for federal taxes.
State Exemptions-- Enter the number of exemptions to use for state or provincial taxes.
Local Exemptions-- Enter the number of exemptions to use for local taxes.
Tax Package-- Enter the tax package that is usually used for this employee.
Gets W-2-- If you need to generate W-2 forms or other tax forms for this account at the end of the year, turn
on this checkbox.
HINT-- Click on the following links for specific withholding info for each US
State and Canadian
Province . Sales Commissions
Commission Rate-- If this employee receives a sales commission, enter the employee's commission rate.
Benefits Setup
Benefit Package-- Enter the benefit package that is usually given to this employee.
Vacation Package-- Enter the vacation package that is usually given to this employee. More Withholding Details
Other Exemptions-- Enter the number of exemptions to use for miscellaneous taxes.
Worker Comp Percent-- Enter the percentage to use for worker's comp, when the rate is different for each employee.
Disability Percent-- Enter the percentage to use for disability insurance, when the rate is different for each employee.
Other Percent-- Enter any other percentages that are needed for tax computations.
Fed Withholding-- Enter the amount for additional federal withholding beyond the calculated amount.
State Withholding-- Enter the amount for additional state withholding beyond the calculated amount.
Local Withholding-- Enter the amount for additional local withholding beyond the calculated amount.
Other Withholding-- Enter the amount for any other additional withholding.

Contact Info
Click the Contact Info button to enter contact and job cost info for each employee.
Contact Info
Address-- Enter the employee's home address.
Telephone-- Enter the employee's home phone number.
E-mail-- Enter the employee's e-mail address.
Social Security-- Enter the employee's social security number, or other identification number.
Emergency Contact-- Enter the person who should be contacted in the event of an emergency.
Job Cost Setup
Category System-- Use the Category System to use when entering costs for this employee.
T&M Billing Rate-- Choose a billing rate that will be used for work by this employee, when making time-and-materials
bills.
Billing Amount-- If you use a billing rate that uses a variable amount, type in the amount that is billed
for this employee.
Job Cost Rate-- Choose the rate that will be used for figuring job costs for this employee's work.
Job Cost Amount-- If you use a job cost rate that uses a variable amount, type in the amount that is figured
for this employee.

Calculated Fields
Goldenseal shows the following calculated fields for each employee:
Comp Time Balance-- Goldenseal tracks any comp time that is owed to the employee.
Sick Time Balance-- Goldenseal tracks sick days owed to the employee.
Vacation Balance-- Goldenseal tracks vacations owed to the employee.
Other Vacation Balance-- Goldenseal tracks miscellaneous vacations owed to the employee.
Advances Owed-- Goldenseal tracks any advances that the employee owes to the company.
Status Field
Use the pop-up menu to enter the employee's current employment status:
Choose Active if they are currently working.
Choose Inactive if they are temporarily not working.
Choose Terminated if the employee quit or was fired.
Terminating Employees
When an employee no longer works for you, change their status to Terminated,
and enter their final working date into the Terminated field.
HINT-- Don't change the employee status until you have entered all hours for the employee, since
you can't assign hours to
an inactive or terminated employee.
You can only delete an employee record if it was never used in a Labor Hours transaction.
Sales Reps
If you give an employee a Commission rate, you can assign them as a sales
rep-- just enter them into the Sales Rep field in Address
Book, Customer Account and Project
Account records.
Goldenseal also assigns a Sales Rep in Sales transactions and project Billing Records.
When you use the Write Payroll command to create payroll, Goldenseal will calculate sales commissions as
a part of employee wages.
Withholding Setup
To calculate payroll tax withholding for employees, click the Payroll Setup button, and enter the following
information in the employee account record:
- Marital Status
- State and Federal Exemptions
- Tax Package used for this employee
For some states, you'll also need to enter data into some fields in the additional
payroll details section. Click here for more information about
withholding taxes in the US and Canada.
Viewing Contacts
To view contact records for this employee, click one of the buttons in
the right side of the record layout.
Click View Appointments to see Appointment records for this employee.
Click View Contact Log to see Contact Log records for this employee.
Click View Document Log to see Document Log records for this employee.
Click View Problem Log to see Problem Log records for this employee.
Using Employee Accounts
To enter employee hours, choose Labor Hours from
the Costs menu.
To do payroll, choose Write Payroll from
the Bank menu.
To handle reimbursements of employee expenses, choose Material
Purchase from the Costs menu, and enter a transaction with Reimbursement
as a condition. As an alternative, you can set up a petty
cash account for use by the employee.

Main Page | Accounts |
Lists | Transactions | Menus |
Index | Website | User Page
|


