|
Use Billing Records for bills that you send out for customer sales and
project work.
HINT-- Billing Records store info about your Accounts Receivable in the Goldenseal accounting
software. BILLING RECORD BASICS
When to Use | Entering Billing Records | Data Fields | Status
Field
Retainage | Miscellaneous Charges | Using Billing Records
BILLING RECORD BREAKDOWNS
Breakdown Basics | Sales | Draw Schedules | Progress
Payments
Time and Materials | Allowances | Change Orders | Rentals
WORKING WITH BILLING RECORD RECORDS
Entering Records | Changing Records | Deleting
Records | Voiding Records
Finding Records | Sorting Records | Fixing Mistakes
WEBSITE INFO LINKS
Accounts Receivable Software | Billing
Software | Project
Billing Software | Project Management Software
RELATED TOPICS
Billing command | Customer accounts | Depositing Funds | Project
Accounts | Sales
When to Use Billing Records
Use Billing Records to send bills to customers for sales or project work.
Each record shows one billing cycle for one customer or project. For project work, the Billing Record determines the
amount of work that is ready
for billing.
You will probably create most Billing Records with one of the Billing commands.
The only time you'll need to create a Billing Record directly is when you bill separately for finance charges or similar adjustments.
Entering Billing Records
You'll create most Billing Records with one of the Billing commands. It
automatically creates Billing Records with a breakdown
table that itemizes the items for which you are billing.
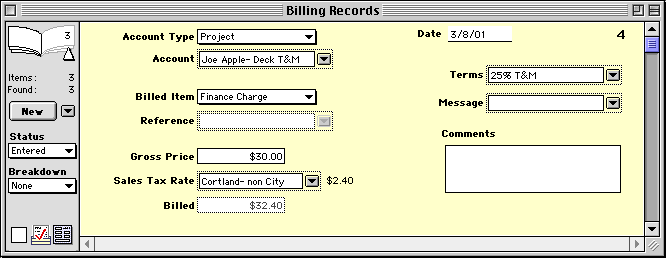
To enter a simple Billing Record to charge for a finance charge, follow these steps:
- Choose Billing Records from the Bank menu.
- Click the New button, or choose New Record from the Edit menu.
- Fill in details about the billing record.
 QUICK
SETUP HINT-- It's easiest to create Billing Records with the Billing command. QUICK
SETUP HINT-- It's easiest to create Billing Records with the Billing command.
Data Fields
Enter the following information for each Billing Record:
Account Type-- Choose the type of account that is being billed.
Account-- For sales billing, enter the Customer account to whom the bill is being made. For project billing, enter the Project account.
For rental billing, enter the tenant.
Billed Item-- Choose the type of bill you are making.
NOTE-- The Billed Item field is not used when there is a billing breakdown.
Reference-- If you are billing for a Sale or Rental Transaction, enter the transaction here.
NOTE-- This field is used only when you enter Sale or Rental in the Billed Item field.
Gross Price-- Enter the amount that is being billed. If you are using a breakdown, the gross amount is calculated from the total of the breakdown
items.
Sales Tax Rate-- Enter the sales tax that will be charged on this billing amount, if any.
NOTE-- Sales tax can only be added to project
billing-- for sales billing, enter sales tax into Sales records
instead.
Amount-- The total amount of this billing is computed automatically, including sales tax.
Date-- Today's date is automatically entered as the billing date. You may change it if you wish.
Record Number-- A billing record number is assigned automatically.
Terms-- Choose the payment terms that are used for this bill.
Message-- Choose the message that will be printed on the billing statement.
Comments-- If you'd like to make any comments about this billing record, enter them here.
Billed Items
The following types of simple billing items are available:
- Sale-- To bill for a single Sales transaction
- Rental-- To bill for a single Rental Transaction.
- Misc. Charge-- For any type of charge that is owed to you.
- Misc. Credit-- For any credits or refunds that you are giving.
- Finance Charge-- For interest charges on overdue balances.
Billing Status
If a billing record has been created but not printed, it will have Entered as a
status.
After a billing record is printed, its status will change to Billed.
NOTE-- If you deliver a bill without printing
it, you can manually change the status to Billed.
When partial payment is received for a billing, its status will automatically
change to Part Paid.
When full payment is received for a billing, its status will automatically
change to Paid.
Goldenseal changes the status to Deposited when a bank
deposit is entered for this item.
If the customer has protested this bill, and there is disagreement
over whether it should be paid, change its status to Disputed.
To cancel a billing record, change its status to Void.
Bill Breakdowns
To bill for more than one item at a time or to bill for project work, enter
a breakdown into the Breakdown popup at the left side of the window.
HINT-- When you use one of the Billing commands, Goldenseal automatically
fills in the proper breakdowns.
The following breakdowns are available for Billing Records:
Retainage
Retainage is an amount that is "held back" from each payment for a project.
Assigning Retainage
To assign retainage for a project, follow these steps:
- Choose Payment Terms from the Options menu, then choose Projects from the submenu.
- Open an existing payment term, or click the New button.
- Enter the retainage amount into the Retainage field.
- Enter other information about the project payment terms.
- Click OK.
- Choose Projects from the Accounts menu.
- Find the project.
- Enter the payment terms which contain retainage into the Payment Terms field.
Deducting Retainage
When you create each Billing Record, the retainage amount is automatically
deducted.
Billing for Final Retainage Amount
When you are finished with a project, follow these steps to bill for the
retainage balance:
- Do a final billing for the project. For a draw schedule or progress payment project, make sure all items have been 100% billed. For a time and materials
project, make sure that all costs have been billed.
- Choose Billing Records from the Bank menu.
- Click the New button.
- Enter Projects into the Account Type popup menu.
- Enter the project into the Account field.
- Enter Retainage Balance into the Billed Item popup menu. The current balance of retainage is automatically entered into the Gross Price.
Miscellaneous Charges
Goldenseal automatically computes finance charges based on the unpaid
balance from the customer or project, and the charges included in the payment terms that they use. Finance
charges are shown in the
Finance Charges field.
You can also type in a finance charge amount.
To bill for finance charges manually, follow these steps:
- Choose Billing Records from the Bank menu.
- Click the New button.
- Enter the account type and account being billed.
- Enter Finance Charge into the Billed Item popup menu.
- Enter the amount of the charge into the Gross Amount field.
Using Billing Records
Each billing record keeps track of an amount that is owed to you-- whether
it comes from sales, rentals or project work.
To view a list of unpaid bills, choose Income from the Reports menu, then choose Unpaid Bills from the submenu.
When you receive payment for the bill, you'll apply the payment to a specific billing record. The billing record will then pass along the payment to
any transactions that are included in the bill.

Main Page | Accounts |
Lists | Transactions | Menus |
Index | Website | User Page
|


