
 |
 |
|
|
||||
Data Entry Basics |
|||||
|
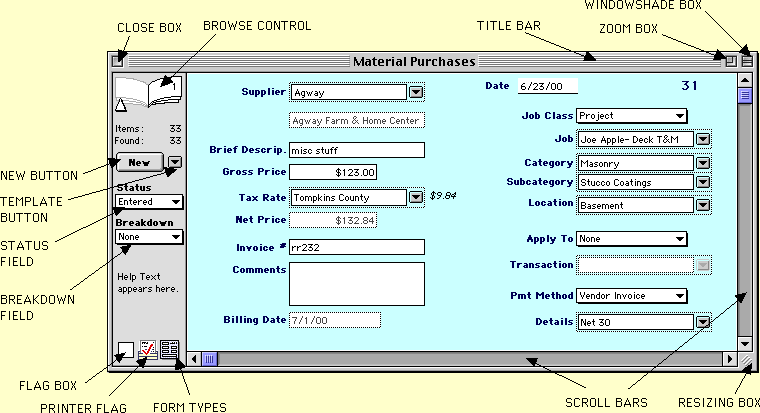
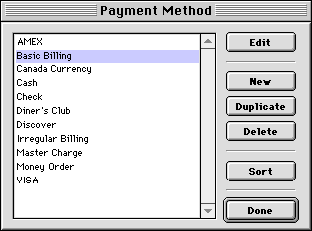
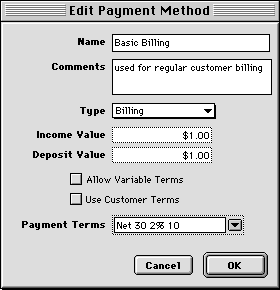
BROWSER WINDOWS LIST WINDOWS TEXT AND NUMBER FIELDS SPECIAL FIELDS OTHER DATA ENTRY BREAKDOWN TABLES WORKING WITH RECORDS Website Info Links RELATED TOPICS All Accounts and Transactions are
displayed in a browser window. When you choose
the menu command
for the account or transaction, Goldenseal opens its window. The browser
window shows one record at a time. To change the size of the window, click in the resize box in the lower right corner and drag to a new location. To close the window, choose Close Window from the File menu (at the top of the screen). If part of the window contents are hidden, click on the scroll bars at the right and bottom sides of the window. Click on the up, down, right and left arrows to move in those directions. A different part of the window will move into view. You can also click on the moving box in the scroll bars, and drag it to a new location. Use
the "book" at the upper left corner of a browser window to move
through records. HINT-- when there are large numbers of records, use the Find command to locate records. You can often narrow the search down to a small group, and then browse through them to find what you need. Underneath the book, Goldenseal tells you the total number of records, and the number of records that are currently found. Browser windows show Help text in the gray part of the window below the Browser control. The help text appears when the mouse is in a control or field. It gives you useful info about that control or field. To turn the display of help text on or off, choose Preferences from the Options menu, and choose Interface from the submenu. To change the help text for any data entry field, choose Custom Layouts from the Options menu, open the layout for the data entry window you'd like to change, then double-click on the field you'd like to change. Each account and transaction window has a Status field at the left side of the window. The Status field is a popup menu. If a transaction has been deposited, paid or otherwise completed, you won't be able to change the status. Otherwise, change the status of a record by clicking in the Status field and entering a different choice. Lists help you to manage the small details of running your business. To see the list of customer payment methods, choose Income Setup from the Income menu, and choose Payment Methods from the submenu. Click Edit to view details for the selected item. You can also double-click on the item in the list. When you edit an existing list item or create a new one, you'll see a second dialog where you can enter details for it. Date fields must contain date values. When you leave a date field, Goldenseal converts what you typed into a valid date (it can translate a wide variety of formats). The date will be displayed in the date format that was selected for the field in the Custom Layout. If you don't type a year, Goldenseal usually enters this year. However during January and February, dates you enter for November or December will get last year's date. When you type a two digit year, Goldenseal nearly always uses the correct century. You only need to type in all four digits for dates that are more than fifty years before or after today's date. In money fields, Goldenseal automatically converts any entered text to a money amount. It also removes any non-numeric characters. HINT-- You don't need to type a currency sign for money values-- the Goldenseal accounting software will add it automatically. Goldenseal automatically uses whatever currency symbol you selected for your System. To change the currency symbol on Macintosh, open the Numbers Control Panel. To change the currency symbol in Windows, open the Regional Options Control Panel, and click the Currency tab. In number fields, Goldenseal automatically converts any entered text to a number amount. It also removes any non-numeric characters. In percent fields, Goldenseal automatically converts any entered text to a percentage amount. If you type 12, Goldenseal converts it to 12%. Text fields can contain any letters, numbers or punctuation. To enter text, follow these steps:
When you click in a single line field that has excess text, the field will expand to the side so all text is visible. Some text fields are multiple line fields. When a field has more than one line, enter text the same as a single line field. If you enter more text than can fit in the first line, it will automatically "wrap" down to the next line. To force the text to jump to the next line, type the Return key. In a multiple line field, click in the text and drag the mouse to the end of the text that is being displayed. The remaining text will scroll up into view. When you type into a time field, Goldenseal converts what you typed into a valid time. The time will be displayed in the time format that was selected for the field in the Custom Layout. If you type A or AM, the date will be considered AM. If you type P or PM, the date will be PM. If you type an hour greater than 12, the time will convert to an afternoon time. Goldenseal also recognizes a few keywords such as noon, midnight, dawn and dusk. If the time of day is not clear from what you type, Goldenseal will use the time that is closest to normal business hours. To select text in a field, click the mouse on one side of the field, keep holding down the mouse button and drag to the other side of the text. If you double-click, Goldenseal will select an entire word. When you use the Tab key to move into a field, all the text is selected. A checkbox is a small square on the screen that lets you enter a "yes or no" value. When the box is checked, the value is "yes". When it is not checked, the value is "no". Each click changes its value. Goldenseal uses clairvoyant fields to enter accounts, list items or transactions. Popup Button Each clairvoyant field includes a popup button. When you click on the button and hold the mouse down, you'll see a menu of all possible choices (usually in alphabetical order).
NOTE-- If there are a very large number of items, the popup menu may not be able to display them all. If that happens, you can still use the keyboard to enter data. Keyboard Entry You can also use the keyboard to enter data into clairvoyant fields. To do so, follow these steps: 1. Press the Tab key until the field is selected, or click the mouse within the field. Popup menus let you choose from a fixed set of choices. To choose an item from a popup menu, follow these steps:
Some fields are calculated, so you can't enter values into them. In some records, a field is disabled because it wouldn't make sense to enter a value for it in this record. Fields are also disabled in locked transactions that have been paid or otherwise closed, or if your password has a time lockout and the transaction is older than the cutoff date. Click here for more about locked records. Account records show an account icon. Double-click on it to assign a different icon to this account. Assemblies and Cost Items can include a Picture field for a drawing of the cost item. To store a drawing there, follow these steps:
When you are finished typing into a data field, click the Tab key to move to the next field. To change the tab order, use the Custom Layouts command to open the data entry layout. Many Goldenseal records include a data table. Tables are present in a few account classes, in some of the list classes and in many transactions. Each data table contains rectangular cells that are arranged in vertical rows and horizontal columns. Each data table has a title at the top of each column. To select a cell, click in it with the mouse. You can also move from one cell to another with the keyboard. Use the following keyboard shortcuts:
To add rows to a data entry table, follow these steps:
NOTE-- Some tables have a fixed number of rows, so you can't add rows to them. Some table cells allow you to enter text or number values. Click in the cell and type in a value. Some table cells show a clairvoyant field, similar to the clairvoyant fields in regular data entry layouts. Click in the cell and start typing to see a list of possible values for the field. You can also click on the small popup button to see a popup menu of values for the field. Some table cells show a checkmark. Click on the checkmark to turn it on or off. To create a new record, click the New button on the left side of the window, or choose New Record from the Edit menu. Goldenseal will show a new, blank record. To duplicate an existing record, choose Duplicate Record from the Edit menu. Goldenseal will make a copy of the current record. You can also use the template button to make copies of previous files. To change a record, simply type in new information. If a record is locked, you won't be able to change some fields. To delete a record, choose Delete Record from the Edit menu. You can't delete a record that has been paid or otherwise posted. You also can't delete a record if it is "in use" by another transaction. To cancel a transaction that has already been entered, you can either delete it, or use the Void status choice to keep it on file as a voided transaction. Voiding a Current Transaction If you make a mistake while entering a current transaction and you can use the same record
for something else, simply enter the information that needs
to be changed right over the old, erroneous data. Voiding an Old Transaction You can cancel any transaction that has already been entered, unless it
has been posted and locked. NOTE-- The original transaction and the voiding operation will be recorded separately in the Audit Trail. When you finish entering a record, press the Enter key or choose Save Record from the Edit menu. Goldenseal will automatically save the record (you'll hear a click). Once you save a record, it is stored on your computer's hard drive. Goldenseal also saves a record when you close its window, click the New button to create another record, print, reconcile, or scroll to a different record. In each case the current record is saved before you leave it. WARNING-- If you switch to a different window before you save a transaction, the record is still not saved. Other parts of Goldenseal will not know what you have entered until you save the transaction. If a record affects other records, information about it will automatically 'post' while the record is being saved. It usually takes only a small fraction of a second for Goldenseal to save a record, but very complex records (or very slow computers) may require a few seconds to post. Some records include fields that cannot be left blank. If data entry in the record is not complete, Goldenseal will warn you about the problem when you try to save the record. You can't leave until it is fixed. HINT-- If you can't finish an incomplete record and want to leave it, change the Status field to Closed or Void. When you complete a transaction, Goldenseal automatically posts it. For example expense transactions update job cost values in the job account, and accounts payable amounts for the vendor account. Posting usually takes only a fraction of a second. The way you fix a mistake depends on when it happened. If you make a typing error while typing data, choose Undo from the Edit menu. It will restore the previous text in the field you are currently using. If you make a mistake in a new record, just type in the correct information. If you make a mistake while changing an existing record and have not yet saved it, choose Revert Record from the Edit menu to restore the contents to what they were when you first opened the record. To fix a mistake in an old record which has not yet been locked, open it and re-enter the correct data. To fix incorrect data in a locked record, there are several choices:
When you have already posted a transaction and then find there was an error in it, you won't be able to change the original transaction-- since there may be bills or payments that are based on the original amunt. Usually it's easiest to create an offsetting transaction to fix that kind of problem. For example, if you entered the wrong cost for a purchase and want to change it after you've done time and materials billing for it, follow these steps:
Goldenseal locks some transaction records after they are used by another transaction. You can change some fields in a locked record, but many of its fields are disabled and can't be changed. A record may be locked for any of the following reasons: Paid Transactions Paid transactions have Paid in the Status field and a Paid watermark. You can still change some fields, but the account, status, amount and payment method fields are locked so you can no longer change them. To unlock a paid transaction, you need to void the bank transaction that pays for the item. To locate the bank transaction, choose Payment Transaction from the View menu. You can also create an offsetting transaction to fix any errors in a paid transaction. Deposited Transactions Deposited transactions have Deposited in the Status field and a Paid watermark. You can still change some fields, but the account, status, amount and payment method fields are locked so you can no longer change them. To unlock a paid transaction, you need to void the bank deposit for the item. To locate the bank transaction, choose Deposit Transaction from the View menu. You can also create an offsetting transaction to fix any errors in a deposited transaction. Billed Transactions Transactions that are in a Time and Materials bill have T&M Billed in the Status field (or Billed & Pd if they are also paid). You can still change some fields, but the account, status, amount and payment method fields are locked so you can no longer change them. To unlock a billed transaction, you need to void the Billing Record that includes it. You can also create an offsetting transaction to fix any errors in a billed transaction. Awarded Estimates Estimates that are included in a Project account get Awarded status and are locked. Any Allowances, Bids or Purchase Orders included in the Estimate's breakdowns are also locked when the estimate is awarded. To unlock an awarded estimate, remove it from the Estimate field in the Project account. Old Transactions A transaction may also be locked if the record is older than what is allowed by the time lock-out in your password. You can't unlock a record that is older than what your time lock-out allows. The only way to change it is to sign on with a password that allows unlimited access. If you can't do that, you'll need to get someone else in your company to do it. You can also create an offsetting transaction to fix any errors in an old transaction.
Main Page | Accounts | Lists | Transactions | Menus | Index | Website | User Page |


 Tables-- Clairvoyant Cells