|
Use Cost Items to describe each item that you purchase, sell or use in projects.
HINT-- Cost Items are the heart of the Goldenseal inventory management software. They
are also important for estimating and expense tracking, either directly or as components in Assemblies.
COST ITEM BASICS
When to Use Cost items | Entering Cost Items | Data Fields
Vendor Prices | Inventory
Setup | Contract Setup | Status
Field
Cost Types | Pricing Methods | Calculated Prices | Updating
Prices
Suggested Quantity | Using Cost Items | Links to Assemblies
WORKING WITH COST ITEM RECORDS
Entering Records | Changing Records | Deleting
Records | Voiding Records
Finding Records | Sorting Records | Fixing Mistakes
WEBSITE INFO LINKS
Inventory Software | Inventory
Accounting Software | Inventory Control Software
Inventory Management
Software | Inventory Tracking Software | Estimating
Software
RELATED TOPICS
Assemblies | Cost Categories | Job Costs | Locations
Unit Cost Basics | Unit Cost Design Hints | Unit
Cost Setup
When to Use Cost Items
Cost items are individual material, labor, equipment or subcontractor costs that you use frequently.
They can be items you buy or sell, or components
in your products or services.
A good set of cost items makes it much easier to keep your business organized and profitable. They are essential if
you provide cost estimates, if you want to do inventory tracking, or if you see frequent changes in the cost
of supplies or resale goods.
Cost items will do the following for you:
- Identify specific expenses, so you can track expenses in more detail than is possible with cost categories.
- Calculate the selling price of items or services that you provide.
- Calculate the cost of items that you include in estimates.
- Speed up data entry for items that you purchase and sell.
- Track inventory quantities, and manage the restocking of inventory.
NOTE-- In the Goldenseal software, cost items are frequently combined
into Assemblies-- especially when you make some
kind of change to items before you sell them, or when you use them in projects.
Create a cost item for each type of material that you use frequently-- whether you resell it, build
it into projects, use it as a component for manufacturing, or consume it as part of your overhead costs.
Also
create cost items for equipment hours, employee hours, and for subcontracted labor or services that
you use frequently.
For example, create a cost item for any of the following:
- Materials you purchase for use in projects or for resale.
- Office supplies you use frequently.
- Hours of equipment time for each item of equipment that you use
- Hours of employee labor for each class of employee.
- Subcontractor equipment or labor.
Entering Cost Items
To enter a Cost Item, follow these steps:
- Choose Cost Items from the Costs menu.
- Click the New button, or choose New Record from the Edit menu.
- Fill in details about the Cost Item.
Data Fields
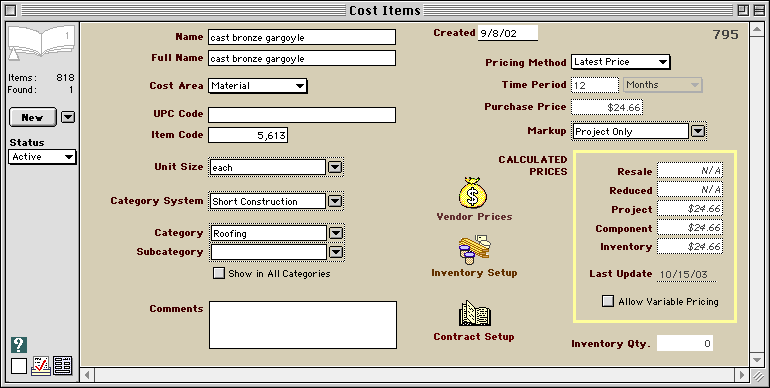
Enter the following information for each Cost Item:
Name-- Type in a name for the cost item. This is the text that will appear in menus.
Full Name-- Type in a complete name for the cost item. You can use this text in reports.
Cost Area-- Use the pop-up menu to choose the basic cost area under which to classify this item.
Item Code-- If you want to use a code number for this item, type it in here. The code number may have up to four digits to the right of the decimal.
Unit Size-- Use the clairvoyant field to enter a Unit Size.
Category System-- Choose an optional Category System to which this item will belong.
Category-- Choose a Cost Category under which to list this cost item.
Show in All Categories-- Turn on the checkbox if you'd like to include this item in all categories, not just the one in the Category field. You
might want to use this option if an item is used in many different cost categories.
Subcategory-- Choose a subcategory under which to list this cost item. You can only enter a subcategory if you use a Category
System that has subcategories.
Suggested Quantity-- Choose the dimensional measurement that gives a suggested quantity for this item.
Calculated-- Turn on the checkbox if the Suggested Quantity is a Calculated Dimension. Turn it off it it's a Basic
Dimension.
Comments-- Type in a more complete description of the assembly here, or any comments you'd like to make about it.
Creation Date-- Today's date is entered automatically when you first create a cost item. You can change this date if desired.
Record Number-- Each cost item has a unique record number.
Pricing Method-- Choose a pricing method to calculate the purchase price for this item.
Main Supplier-- Enter the person, business or other entity that is most likely to provide this cost item for you. Depending on the cost
type, this might be a piece of equipment, an employee, a material supplier, a subcontractor or an other cost account.
Purchase Price-- If you chose Manual as a pricing method, enter the purchase price for the item. If you chose some
other pricing method, the calculated purchase price is displayed.
Markup-- Choose a Markup System to calculate pricing for this item. CALCULATED PRICES
Resale Price-- Goldenseal calculates a price for simple sales of this item.
Reduced Price-- Goldenseal calculates a price for sales of this item when the item is 'on
sale'.
Project Price-- Goldenseal calculates a price for use of this item in estimate or project
work.
Component Price-- Goldenseal calculates a price for this item when it's included in an Assembly.
Inventory Price-- Goldenseal calculates the inventory value of this item.
Inventory Quantity-- Goldenseal displays the current inventory quantity for this item.
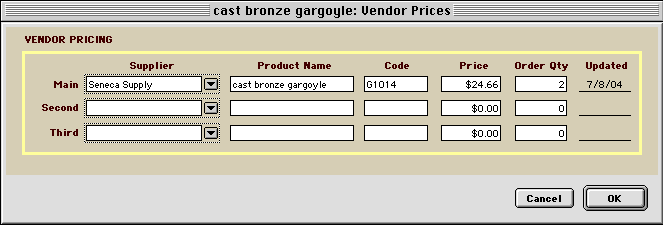
Vendor Prices
The Goldenseal software automatically tracks prices from up to three different suppliers. It fills in the latest price
automatically whenever you enter purchases that include this item. If there are vacant slots in the Vendor
Prices section, Goldenesal automatically fills in purchases from each vendor.
Enter the following info for each vendor:
Supplier-- Enter each supplier that provides you with this inventory item.
Product Name-- Enter the (optional) name that each supplier uses for this inventory item.
Code-- Enter the (optional) product code or UPC code that each supplier uses for this inventory item.
Price-- Enter the current price from this supplier.
Order Quantity-- Enter the usual quantity that you order from each vendor when you are out of stock.
Last Modified-- This date is changed each time you enter a new price, or when a price is updated automatically.
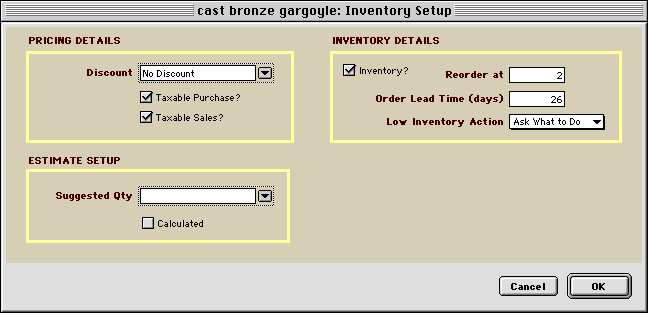
Inventory Setup
Click the Inventory Setup button to enter detailed info for pricing, inventory tracking and cost estimating.
Pricing Details
Discount-- Choose the Item Discount that is used for sales of this item.
Taxable Purchase-- If you normally pay sales tax for this cost item when you buy it, turn on the checkbox.
Taxable Sale-- If you normally charge sales tax for this cost item when you resell it or provide it
as a service, turn on the checkbox.
Inventory Details
Inventory-- If you plan to track inventory quantities for this item, turn on the checkbox.
Reorder At-- If you inventory this cost item, enter the quantity at which you should be warned to order
or create more.
Order Lead Time-- Enter the number of days it takes before you receive an order
for this item.
Low Inventory Action-- Enter the action to take when you sell this item and it is out of stock.
You can use any of the following inventory actions, when an item is out of stock:
Ask What to Do-- Goldenseal will give you the choice to cancel the sale, back order the item or create
a purchase order.
Block
the Sale-- Goldenseal will not let you enter the sale if inventory is too low.
Warn & Back Order-- Goldenseal will give a warning and then back order the item.
Create Purchase Order-- Goldenseal will back order the item, and create an automatic purchase order.
Cancel Order-- Goldenseal will cancel orders for items that are out of stock.
Set Inventory Negative-- Goldenseal will continue with the sale, even if there is insufficient inventory.
Warn
& Set Negative-- Goldenseal will warn you about the low inventory and then continue the sale.
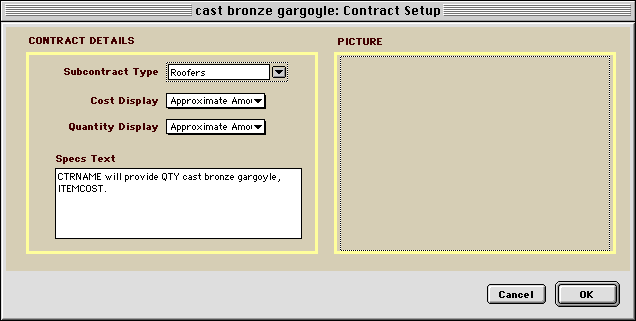
Contract Setup
Click the Contract Details button to enter additional info about this Cost Item.
CONTRACT DETAILS
Contract Costs Display-- Enter the way you'd like to handle the cost of this item in the specifications
portion of a Contract.
Contract Quantity Display-- Enter the way you'd like to handle the quantity of this item in the specifications
portion of a Contract.
Subcontract Type-- Enter the type of subcontracts which will include this item.
Specification Text-- Enter the text that describes this item in
the specifications portion of a Contract.
PICTURE
To add a picture for this item, first copy the picture in any graphics program. On Macintosh, click
in the field, and then choose Paste from the Edit menu. On Windows, right-click in the picture field and choose
Paste from the popup menu.
Status Field
Enter any of the following status values:
Active-- The item is fully active.
Special Order-- The item is inactive. In sales transactions with an Item breakdown, Goldenseal will include it only
if the Conditions field is set to Special Order.
Inactive-- The item is inactive. The Goldenseal software will not included it in the list of items.
Cost Types
Six basic types of Cost Items are available:
Equipment-- For use of a piece of equipment.
Labor-- For a period of work that will be done by an employee.
Material-- For tangible items.
Other Cost-- For services that don't fall into one of the other categories.
Subcontractor-- For subcontractor services.
Obligation-- For gift certificates and similar items.
Pricing Methods
The Goldenseal software gives you several ways to calculate a base purchase price for a cost item. You choose a pricing
method by selecting an item from the
Pricing Method pop-up menu.
Choose from the following pricing methods:
Manual-- For manual pricing, you simply type a price into the Purchase Price field. It's up to you to keep the purchase price up-to-date.
HINT-- It's a good idea to type in a 'starter' price before you change to a different pricing method. Goldenseal will use
the starter price until you enter a purchase transaction that includes this item.
Latest Price-- Goldenseal uses the most recent expense transaction that includes this item in an Item breakdown. Prices are updated whenever you
enter a new transaction that includes this item.
Latest Main Supplier-- The same as Latest Price, but Goldenseal only looks at prices from the Main Supplier that you entered.
Highest Price-- Goldenseal uses the highest price for this item in purchases during the entered time period. Prices are updated whenever you enter
a new transaction that includes this item.
Highest Main Supplier-- The same as Highest Price, but Goldenseal only looks at prices from the Main Supplier that you entered.
Average Price-- Goldenseal uses the average price for this item in all purchases during the entered time period. Prices are updated whenever you
enter a new transaction that includes this item.
NOTE-- If you enter a purchase and there are no other purchases within the
time period, then this option will act the same as the Latest Price choice.
Average Main Supplier-- The same as Average Price, but Goldenseal
only looks at prices from the Main Supplier that you entered.
If you display pricing for this cost item, then it's best
to choose Manual, Latest Price or Main Supplier as a pricing method,
since the other methods result in frequent price changes.
If you are a construction business or otherwise don't display
pricing, you can use the pricing method that best matches your needs.
Calculated Prices
Five different prices can be calculated for each cost item. The method
of computing each price is set in the Markup System.
The prices are:
Resale Price-- The basic price that is used when this item is included in a Sales transaction that has an Item breakdown.
Reduced Price-- The price that is used in a Sales transaction when the On Sale checkbox is turned on.
Project Price-- The price that is used when this item is included in an Estimate that has an Item breakdown.
Component Price-- The price that is used when this item is included as a component in an assembly.
Inventory Price-- The price that Goldenseal uses to calculate inventory value.
Updating Cost Item Prices
The Goldenseal software automatically updates cost item prices when you enter material
purchases or other expense transactions.
You'll need to use an item breakdown, and include the specific cost items that were purchased.
To enter prices without making an actual purchase, follow these steps:
- Choose Material Purchases from the Costs menu.
- Click the New button.
- Enter Pricing Only into the Status popup menu (at the left side of the window).
- Enter Items into the Breakdown popup menu (at the left side of the window).
- Click in the first row of the breakdown table, and enter an item that you'll be pricing.
- Click the Return key to enter another item.
- Repeat steps 5 and 6 for as many items as you'd like to enter.
Suggested Quantity
The Suggested Quantity field calculates the amount of this item that will
be included in an estimate, based on the dimension measurements for a specific estimate.
Enter a Dimension which best calculates quantities for this item. If you turn on the Calculated checkbox, you can enter
a Calculated Dimension.
When you include this assembly in an item breakdown in an estimate, Goldenseal will fill in the suggested
quantity, based on the dimension measurements for that specific estimate.
HINT-- If you combine this item with other items or if you want to include a waste factor, it's easier to include
it in an Assembly, and then enter the Assembly into estimates.
Using Cost Items
To include a Cost Item in an Assembly,
follow these steps:
- Choose Assemblies from the Costs menu.
- Find the assembly where you'd like to include this item.
- Click in the bottom row of the breakdown table.
- Hit the Return key.
- Enter this item's type into the Cost Area column.
- Enter the Cost Item into the Cost Item column.
To purchase a Cost Item, follow these steps
- Choose Material Purchases from the Costs menu.
- Click the New button, or choose New Record from the Edit menu.
- Enter the supplier and other purchase information.
- Click on the breakdown popup, and enter Item.
- Click in the first row of the breakdown table.
- Enter the Cost Item into the Cost Item column.
To sell a Cost Item, follow these steps:
- Choose Sales from the Income menu.
- Click the New button, or choose New Record from the Edit menu.
- Enter the customer and other sale information.
- Click on the breakdown popup, and enter Item.
- Click in the first row of the breakdown table.
- Enter the Cost Item into the Cost Item column.
To include a material Cost Item in an estimate, follow these steps:
- Choose Estimates from the Income menu.
- Click the New button, or choose New Record from the Edit menu.
- Enter basic information for the estimate.
- Click on the breakdown popup, and enter Item.
- Click in the first row of the breakdown table.
- Enter Material into the Cost Area column.
- Enter the Cost Item into the Cost Item column.
HINT-- It's usually easier to use Assemblies in an estimate, since
they include all the labor, materials and other components
in a single line item. But you can enter Cost Items directly if you
don't have an assembly that includes them.
Links to Assemblies
After a Cost Item is included in an Assembly,
you can't delete it.
To see all the Assemblies that include this Cost Item, choose Detail Transactions from the View menu.

Main Page | Accounts |
Lists | Transactions | Menus |
Index | Website | User Page
|


