|
This section explains how to view and print reports in Goldenseal.
For a listing of specific reports, click here.
REPORT WINDOW BASICS
Report Window | One Item Reports | Calculator
Reports
Date Ranges | Date Choices | Item Ranges
Found Items | Flagged Items | Breakdowns | Date
Breakdowns
Match Field | Printing Reports | Save As Text |
Custom Reports
FAQ-- Frequently Asked Report Questions
Website Links
Accounting Software | Business
Management Software | Project Management Software
RELATED TOPICS
Calculations | Custom Calculations | Custom Layouts | Printed
Forms
Report Layouts | Report Tables | Summation Calculations
Report Window
To open a report, choose one of the commands from the Reports menu.
For example, to see a list of checking transactions, choose Banking from the Reports menu, and choose Checking Transactions from the submenu.
When you open a report you'll see a report window. Click the Update button to fill in data for the report.
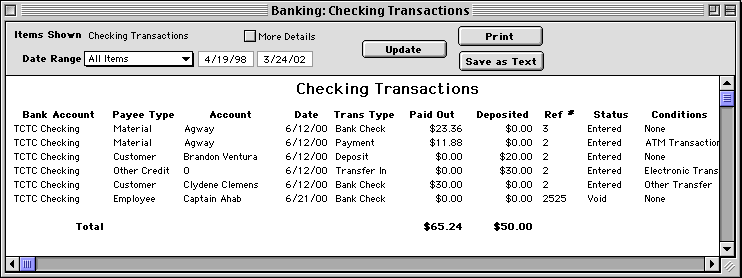
Most reports show a report table which is a list of transactions or accounts.
To see a listed account or transaction, double-click anywhere on its row. Goldenseal will open a browser
window that shows it.
HINT-- Sometimes a report is the fastest way to locate a specific transaction.
To
set up specialized reports, click on the More Details check box. It will show you all of the report
controls , which let you set the data that is included, and the way it is displayed.
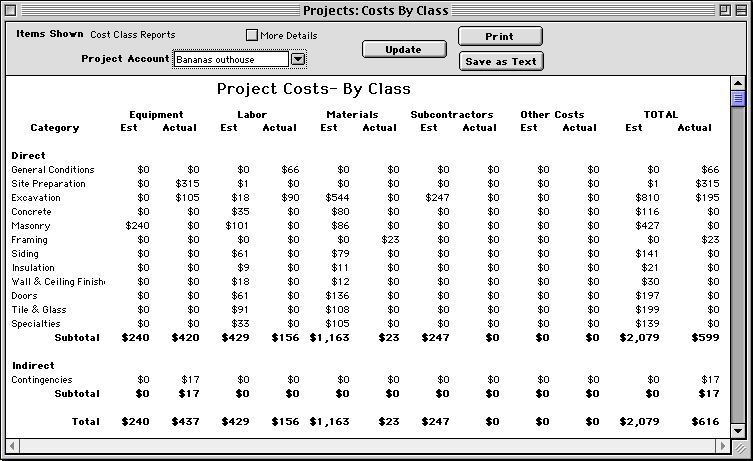
One Item Reports
Some reports give you information for just one account. They have
a slightly different format.
For example, to see costs for a project account, choose Projects from the Reports menu, and choose Costs By Class from the submenu.
When you open a "one item" report you'll see a slightly different report window. Enter an account, and then click the Update button
to fill in data for the report.
To see a listed account or transaction, double-click
anywhere on its row. Goldenseal will open a browser
window that
shows it.
HINT-- Sometimes a report is the fastest way to locate a specific transaction.
To
set up specialized reports, click on the More Details check box. It will show you all of the report
controls , which let you set the data that is included, and the way it is displayed.
Calculator Reports
A few reports are built from calculators, rather
than from a report table.
For example to see a balance sheet report, choose Financials from the Reports menu, then choose Balance Sheet from the submenu.
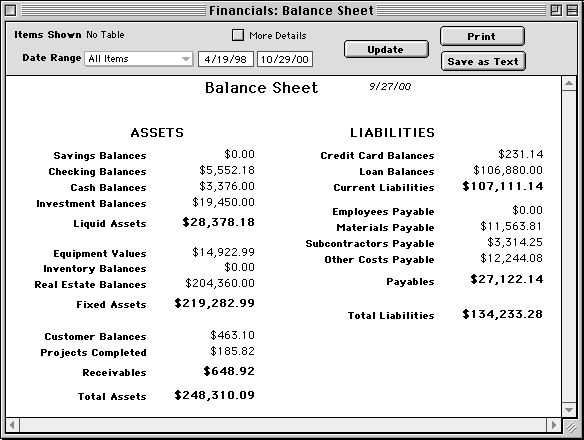
You'll see a current balance sheet, with values
that are calculated automatically from the most recent account and transaction information.
Report Controls
Use the report controls to change the data that shows in a report, and
the way it is displayed.
Here is information about each report control:
Items Shown-- If the report includes a report table, Goldenseal shows you the items displayed there.
More Details-- Turn on the More Details check box to see all of the report controls. Turn it off to see only the most important ones.
Date Range-- Choose the date range of items to include. You can pick one of the common date ranges, or choose
Custom Range and type in a range of dates.
NOTE-- Most reports show all items between the two dates, but a few reports use only the first date, or use the dates for
two compared ranges.
Item Range-- Choose the item range of items to include.
Account Class-- For a breakdown or a match field that lists accounts, enter the type of account to include.
Date Field-- For items that include more than one date, enter the date field to use when finding a date range.
Breakdown-- Enter the type of breakdown to use in the report. You can show a simple list of all items, or a breakdown
based on the values from any popup menu or clairvoyant field.
Match Field-- To find only records with a certain value, choose a data field to use as a match field, and then fill
the value you want to match into the clairvoyant field.
Condensed-- Turn on the Condensed check box to see only totals for each breakdown. Turn it off to see all
the items in each breakdown, as well as the totals.
Update button-- Click the Update button to fill in data, using the current report values.
Print button-- Click the Print button to print the report, as you see it on the screen.
Save as Text button-- Click the Save As Text button to save the data from the current report as a text file.
Date Ranges
The Date Range popup menu lets you see items within a specific time period.
To use it, follow these steps:
- Enter a different value into the Date Range field.
- Click the Update button.
- You'll see only those items dated during the new time period.
The Date Range popup includes a large selection of common time intervals.
You can also use Custom Range, and type in any two dates.
Date Choices
Some accounts and transactions include more than one date. To set the date
field that is used for the date range, follow these steps:
- Turn on the More Details check box. It shows you additional controls to set the details shown in the report.
- Choose a different type of date in the Date Field popup menu.
You can use any of the following date fields (only some are available for
each type of record):
All dates-- Goldenseal will include all items, no matter what date range you use.
Date Entered-- The entry date. This is usually the date displayed at the top of the record.
Date Created-- The date the record was created.
Date Revised-- The date the record was last revised.
Date Started-- The start date for estimates, projects and similar items.
Date Completed-- The completion date for estimates, projects and similar items.
Discount Date-- The date that discounts expire (based on the payment terms).
Date Billed-- The date this record was billed.
Date Due-- The due date for payments.
Date Expired-- The expiration date (for contracts).
Date Paid-- The date this item was paid for.
Item Ranges
The Item Range popup menu lets you see items with a specific completion
status. It also lets you see items that have been found or flagged.
You can use any of the following choices:
All Items-- Includes all records.
Active Items-- Includes active records,
Completed Items-- Includes completed items, which have been deposited, paid, or otherwise finished.
Found Items-- Includes the current found set.
Flagged Items-- Includes items that have flag box turned on.
Found and Flagged-- Includes all items in the current found set that have flag
box turned on.
Overdue Items-- Includes unpaid items that are currently past due.
Paid Items-- Includes all items that have been paid.
Unpaid Items-- Includes all items that have been not been paid.
Open Items-- Includes items that are not yet completed.
Planned Items-- Includes all items with Planned status.
Special Items-- Includes special items such as Hot or Urgent status, and expenses with special conditions.
Void Items-- Includes all items with Void status.
To use an item range to find only items already paid, follow these steps:
- Turn on the More Details check box. It shows you additional popup menus that give you more control over the details shown in the report.
- Choose Paid Items from the Item Range popup menu.
- Click the Update button.
- You'll see only those items in the date range that have been paid.
Showing Found Items
Usually the controls in the Report window will be able to show you what you
need for reports. If you want to show a more complex set of items,
use the Find and Skip commands first to locate the items, before
you make the report).
To use Find for reports, follow these steps:
- Choose Material Purchases from the Costs menu.
- Use the Find commands to locate the items you'd like to show in the report.
- Choose Expenses from the Reports menu, then choose Material Purchases from the submenu.
- Enter Found Items into the Item Range popup menu.
- Click the Update button.
Showing Flagged Items
To use the flag button to make a complex report, follow these steps:
- Choose Material Purchases from the Costs menu.
- Turn on the flag button in the lower left corner of each record that you'd like to include in the report (see page 39).
- Choose Expenses from the Reports menu, then choose Material Purchases from the submenu.
- Enter Flagged Items into the Item Range popup menu.
- Click the Update button.
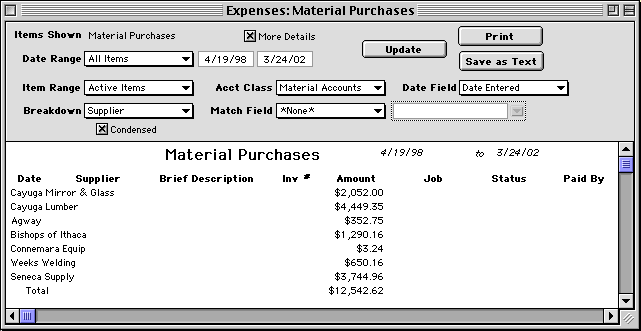
Report Breakdowns
The Breakdown popup menu allows you to group report items into sub-headings.
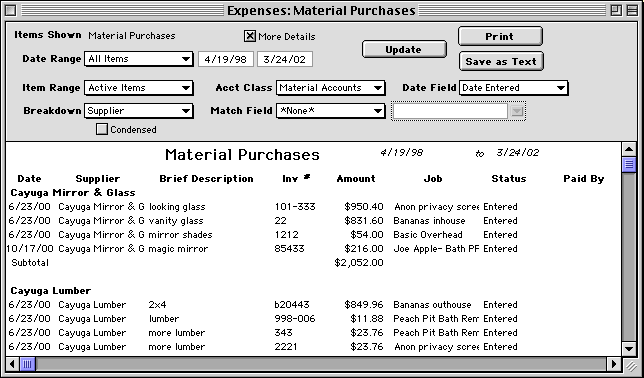
For example, to see all material purchases grouped by supplier, follow these
steps:
- Choose Expenses from the Reports menu, and choose Material Purchases from the submenu.
- Turn on the More Details check box.
- Choose Supplier in the Breakdown popup menu.
- Click the Update button.
- You'll see a listing of all purchases grouped by supplier.
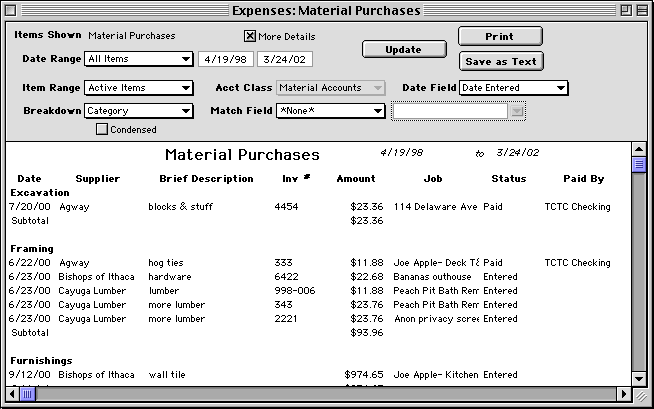
To see a listing of purchases grouped by cost category, follow these steps:
- Choose Expenses from the Reports menu, and choose Material Purchases from the submenu.
- Turn on the More Details check box.
- Choose Category from the Breakdown popup menu.
- Click the Update button.
To see purchases grouped by payment method, follow these steps:
- Choose Payment Method from the Breakdown popup menu.
- Click the Update button.
Time Breakdowns
Reports can show a breakdown by day, week or month.
For example, to see purchases grouped by week, follow these steps:
- Choose By Week in the Breakdown popup menu.
- Click the Update button.
- You'll see a listing of purchases grouped by the week of purchase.
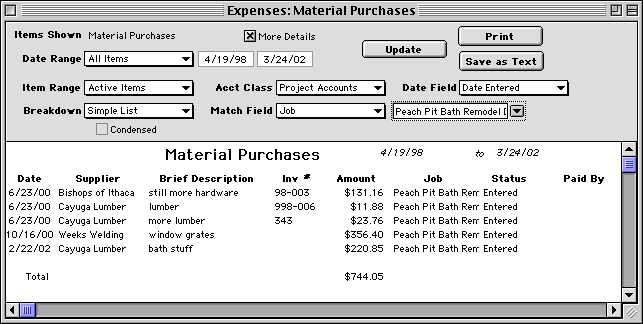
Match Fields
Use the Match Field popup menu to display only those items that include a particular
value in a field.
For example, to find purchases for a specific job, follow these steps:
- Choose Expenses from the Reports menu, and choose Material Purchases from the submenu.
- Enter Job into the Match Field popup menu.
- Enter Project Accounts into the Account Class popup menu.
- Enter a specific job into the clairvoyant field to the right of the Match Field popup.
- Click the Update button.
Account Classes
The account class popup determines which class of accounts to display in
the report.
It is only active if you have a breakdown or a match field that includes accounts.
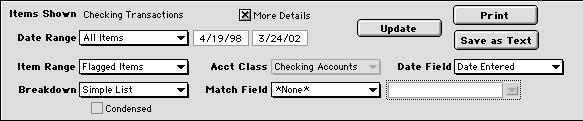
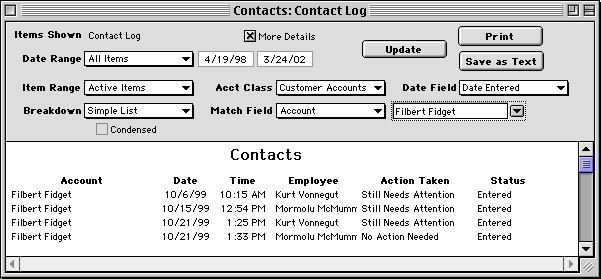
For example, to see a report of all contacts with a specific customer, follow these steps:
- Choose Contacts from the Reports menu, and choose Contact Log from the submenu.
- Choose Account in the Match Field popup.
- Choose Customer Accounts in the Account Class.
- Enter a customer in the clairvoyant field next to the Match Field.
- Click the Update button to see all contacts with the customer.
Condensed Reports
Use a condensed report to show a breakdown that shows only totals for each
breakdown, without including any items.
For example, to get a report of purchases from each vendor, follow these steps:
- Choose Expenses from the Reports menu, and choose Material Purchases from the submenu.
- Turn on the More Details check box.
- Choose Supplier in the Breakdown popup menu.
- Turn on the Condensed check box.
- Click the Update button.
- You'll see totals for each supplier.
HINT-- To see the specific items purchased from each vendor, turn off the Condensed check box and
click
the Update button again.
Printing Reports
To print a report, click the Print button.
HINT-- To change the format for printing, use the Custom Layouts command. You can use a fixed printing format, or you can
use the Page Setup options.
Saving Reports as Text
To save the data in a report, click the Save As Text button. You'll be
asked to save a file onto your computers hard drive.
You can open the file with any spreadsheet or word processor program.
Custom Reports
You can use the Custom Layouts command to create custom
reports.
When you do that, your new reports will show up in the Custom Reports menu, at the bottom of the Reports menu.

Main Page | Accounts |
Lists | Transactions | Menus |
Index | Website | User Page
|