|
 |
|
|
||||
Painting Details |
|||||
|
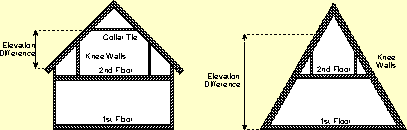
PAINTing DIMENSIONS PAINT DETAILS DIMENSION BASICS Website Info Links RELATED TOPICS Cape Cod buildings (sometimes known as "story-and-a-halfs") and A-frame buildings are unusual because the upper story is inside the roof framing, not beneath it. If you are painting a Cape Cod or A-Frame project, enter a negative number for the difference between the
top floor ceiling height and the eaves, on the Exterior
Dimensions form. That will account for the reduced roof line. For an A-frame, measure down from the average top floor ceiling height to the bottom of the sloped roofs, and enter it as a negative number on the Exterior Dimensions card. For the upper floor of Capes and A-frames (or for other loft areas that fit entirely under the roof framing), enter the length of any gable end walls and any knee walls as exterior walls on the Basic Dimensions or Rooms forms. If there are no knee walls being built upstairs, and the room extends all the way to the junction of roof framing and floor framing, enter the gable end walls only, since no side walls exist. When entering upstairs floor area for either type of project, include only the floor area that will actually be finished and walked upon. Storage area under the eaves should not be included in the basic floor areas. Cathedral ceilings and other raised ceilings are handled differently, depending on the layout of the building and the construction type. Room by Room PaintingIf you enter rooms for the project, simply enter the ceiling height for each room. Goldenseal will properly compute all dimensions.HINT-- Be sure that you enter new wall framing between two new rooms into only one of the room cards. Remember that a ÇcathedralÁ room may adjoin rooms both upstairs and down! Entire Story RaisedIf an entire story has high ceilings, there is no need to do anything special in Goldenseal. Simply enter the high ceiling on the Basic Dimensions form, and everything will be calculated properly.One Area Raised by a Floor Cut UpstairsIf the project has two stories or more, and some rooms have a raised ceiling because there is no floor above them, it's also easy to handle. Follow these steps:
One Area Raised, No Floor Cut UpstairsOn some projects, one or more rooms have a higher ceiling because the roof is higher, or because scissors trusses or open rafters are used instead of a standard triangular truss. In If you enter a project as separate rooms, simply enter the average ceiling height for each room. Goldenseal will calculate wall areas automatically and accurately. When you enter ceiling heights into the Basic Dimensions form, enter the average ceiling height for each story that is part of the project. If the entire story has the same ceiling height, use that measurement. If only a small part of the project has a lower ceiling height (for example, just hallways and bathrooms) ignore the height reduction, and use the ceiling height found in most of the project. If ceiling heights vary between different parts of the project, use a weighted average. To calculate a weighted average, follow these steps:
Treat areas under cathedral ceilings (where the upper floor has been removed to produce an area two stories high) as having a normal ceiling height on each story. Do not enter such areas as double height, since the excess wall area will be figured in when you enter walls in the upper story. A dormer is any smaller roof "cut through" and completely surrounded by the main roof.It will consist of an outer wall, two triangular side walls, and a roof. If your project contains any new dormers, enter their quantity into the Dormers field. Otherwise enter a zero. Also enter the following information about dormers:
Goldenseal will use the dormer dimensions to calculate the cost of painting them. When computing the length of exterior walls, start by measuring the total length of all walls that are exposed to the outdoors and that are being worked on, for each story of the project.
Exclude porches, decks and sheds. Also exclude the garage, unless you are including it as part of the main building. When computing floor area, start by measuring the total gross area of the project that is within the outside surface of each exterior wall. Then make the following adjustments:
Garages may be considered as part of the main structure, or entered in Exterior Dimensions as a separate entity. Handling a Garage as a RoomTreat the garage as a part of the main building in either of the following cases:
Handling a Garage as a Separate StructureTreat the garage as a separate entity in any of these cases:
Interior WallsEnter the total length of any walls being worked on that are not exposed to the outside, for each story of the project.HINT-- Because the layout of interior walls varies so much between different projects, Goldenseal does not suggest a quantity for interior walls.
When measuring the length of inside walls, measure right through doors, but skip any openings that will not be filled with a door. Include the length of
all interior walls that show up on the plans, even if they are
not full height. Goldenseal can handle painting of multi-family residential projects, or multi-unit commercial work. If you have multiple units in one building, you don't have to do much that's special. Simply choose the type of construction you are doing on the Basic Dimensions layout, enter measurements for the building just like any other project, and enter the number of living units (or businesses) into the Number of Units field. There are several ways you can approach projects that contain more than one building. How you do it depends on how you'd like to manage the project:
Town HousesWhen estimating town houses or other side-by-side units, be sure to enter the lineal feet and square feet of party walls into the Basic Dimensions card, and the amount of party wall framing on the Structural Dimensions card.Stacked Multiple UnitsWhen estimating 'stackedÁ multiple units, don't enter any party walls, unless the building itself touches other buildings on its sides. On each floor, include both the living unit(s) on that floor, plus any common areas such as stairways, utility areas and halls.Almost every project has something that is out of the ordinary. Some seem to be nothing but weird items! There are several ways to handle weird and tough details, depending on how likely you are to see them again. Enter them On the FlyFor items that you probably won't ever use again, use the Unallocated choices to type in a number.To do so, follow these steps:
Enter a Cost AdditionIn some cases you can use a regular Cost Item or Assembly that is close to the unusual item, and then use the Unallocated choices to enter just the difference in cost.For example, to enter framing costs for a curved wall:
New Unit CostFor an item that you may use again someday, create a new Cost Item or Assembly so you can include it in future projects.The unit cost can be for a full item, or for an Çadd onÁ cost that you'll attach to a more basic type of construction, just when you need it. Room CountsTreat any of the following as one room:
Usually you can just enter measurements for four walls, on four sides of a room. For a non-rectangular room, you can divide the walls into four sections any way you'd like. You can adjust wall measurements in any of the following cases:
When calculating basic construction areas, Goldenseal assumes that all ceilings are horizontal. If you enter sloped ceilings correctly, the calculated areas will be extremely close to reality. If most of the ceiling is flat but a few parts of the ceiling are lower, use the height of the flat part for the ceiling height. The calculated wallboard area may be slightly too high, but it usually won't be too far off to be a problem. If most or all of the ceiling is sloped, use the average ceiling height. Usually that is halfway between the low point of the roof and the high point. If you have a sloped ceiling that is fairly steep, its ceiling area will increase. To account for this, you may want to add to the total ceiling area
on the Miscellaneous Dimensions card. The area of a ceiling will increase by the following amounts for different slopes:
When working with a sloped ceiling, you may want to add slightly to the cost of hanging wallboard on the ceiling. If you need to frame one of the end walls with a sloping top plate, add some time for the additional framing labor. Unit prices work well for ÇnormalÁ quantities, but they are often too low when used to estimate very small quantities of work. You can't hang one square foot of wallboard in one-thousandth the time it takes to hang 1,000 square feet! Enter them On the FlyIf you are using a very small quantity of something, you can enter it as an Unallocated line item, with a rough estimate of what it will cost.To do so, follow these steps:
Enter a Cost AdditionFor small quantities you can also use the regular Cost Item or Assembly for the item, and then enter Unallocated lines to enter the additional labor for the small quantity. You can also enter any additional material costs, if there will be more waste.New Unit CostsIf you often need to install small quantities of some common items, create a new Assembly for a minimum quantity. You can use a Flat Rate Item in the assembly to cover the start-up time, or minimum materials that you need. In a project with more than 3 upper stories, Goldenseal considers all additional floors to be duplicates of the third story. In many 4 and 5 story "stacked" projects, the bottom floor and top floor have a different layout, and middle stories are all the same. If that is the case, enter the top floor floor plan into the second story on the Basic Dimensions layouts, and the floor plan for the middle floors into the third & up story. Use the Estimate Locations command to enter individual rooms into Goldenseal. Normally a room will include one open volume of space within the building, with or without attached closets or other utility spaces. In some cases you may want to define a room as a slightly different space to handle unusual conditions, or to make the estimating process easier. ClosetsUsually you'll include closets as a part of the room into which they connect (with a partition wall between them). If a closet gets very different treatment from the attached room, enter it as an independent room.HINT-- Sometimes it's easier to include a closet as part of a room to which it's not attached-- for example, if that makes both rooms rectangular and easier to measure. Splitting RoomsA large room that gets drastically different treatments in different parts of the room can be split into two different rooms, to make it easier to specify what is being done to each surface. Sometimes it is also convenient to split a long hallway or other large room into more than one portion.To split a room:
Combining RoomsTo cut down on the number of rooms in larger projects, you can consolidate two or more rooms into a single room.WARNING-- Only combine rooms if they have similar ceiling heights, and if they are being worked on in a similar way. To combine one or more rooms:
Adding to an Existing RoomIf you are enlarging an existing room with brand new construction, handle it as two different rooms by following these steps:
HINT-- Enter only three walls for the new room and existing room, since the fourth wall is 'open' between them.
Main Page | Accounts | Lists | Transactions | Menus | Index | Website | User Page |