|
 |
|
|
||||
Project Deposits & Down Payments |
|||||
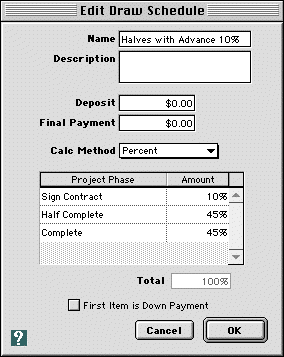
| How do I enter deposits or down payments at the start of a project? In Goldenseal project billing software, the way you'll handle payments at the start of a project depends on the billing type. There are three basic types of project billing, and project down payments work slightly differently for each. HINT-- For small, quick projects that get a single payment, you can also use a Sales transaction. When you receive funds, you can print a payment receipt diretly fro the Sale. Draw Schedules For a Draw Schedule project, you can either type in a separate down payment, or set up the down payment as one of the steps in the Draw Schedule.
When you are ready to start the project and accept the down payment, follow these steps to create a bill for it:
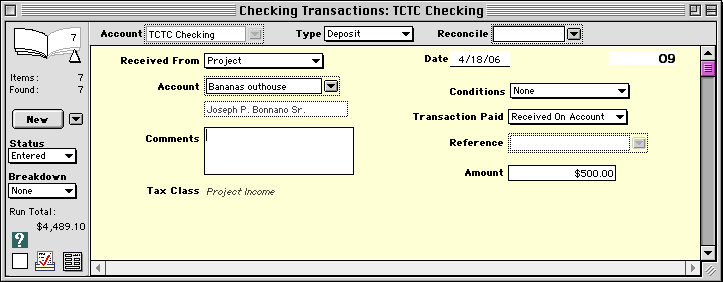
Use the Deposit Funds command to deposit the check into your bank account. Follow the link for more about draw schedule billing in the Reference manual. Progress Payments Progress Payment billing is based on actual work completed. There are two ways you can handle deposits or down payments for that type of billing. OPTION 1-- Add a project category for work at the beginning of a project. With this option, you'll add a line item in your estimate for the amount of the down payment. You can just call it "down payment", or you can have it cover estimating and design work, contract preparation or other tangible tasks. When you are ready to start the project, create a regular Progress Payment bill, and mark off the down payment items as completed. OPTION 2-- Enter a payment On Account. With this option, you will simply accept a pre-paid advance against future work. Follow these steps to enter a down payment directly, without using a Progress Payment bill for it:
When you start billing for actual progress, Goldenseal will deduct the On Account amount from the progress payments. Follow the link for more about progress payment billing in the Reference manual. Time and Materials Time and Materials billing is based on actual expenses. If the project uses a down payment or deposit at the start of the project, follow these steps to enter it:
The first bill for actual expenses will subtract the deposit from the total amount owed. Follow the link for more about time and materials billing in the Reference manual. Click here to return to Project Management topics.
Topics | Previous | Next | Getting Started Manual | Reference Manual | Site Map | Website
|