| How do
I handle markup on Time & Materials projects?
Goldenseal project
billing software gives you several ways to cover overhead and profit
on "cost plus" projects. There are four ways
to add markup to the actual costs, in your
time & materials
project bills. They let you cover your overhead
expenses, and get some profit. You might say
these are the "plus" in
your "cost
plus" billing!
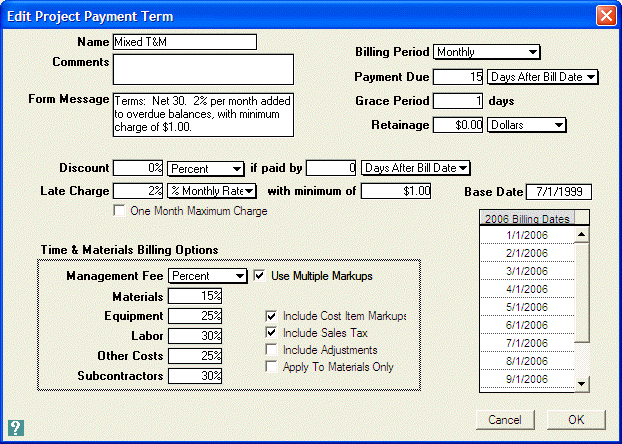
Use any combination of the following: Percentage Markup-- Project Payment Terms
You can set up Project
Payment Terms that add
a general markup or "management fee" to your T&M
project billing. To do that, follow these steps:
- Choose Payment Terms from the Options menu, and choose Projects from
the submenu.
- Double-click on an existing set of terms, or click the New
button to create a new set of terms.
- Enter basic info for the Project Payment Terms-- such as
late charges, and billing frequency.
- Enter the Time & Materials Billing Options. You can charge
the same percentage markup for all items, or you
can turn on the Use Multiple Markups checkbox, and
enter different markups for each type of cost.
- Click OK.
After you have set up the T&M payment
terms, assign them to your project. To do that, follow
these steps:
- Choose Projects from the Accounts menu.
- Locate your T&M project.
- Double-click on the More Info button.
- Enter the terms into the Payment Terms field.
- Click OK.
Billing Rates
For equipment, labor and subcontractor costs, you can
add markup in the amount that you bill per hour or day. It
can be a replacement for the "management fee" in the payment
terms, or an addition to it.
To add markup for labor hours, follow these steps:
- Choose Billing
Rates from the Options menu, and choose Labor from
the submenu.
- Double-click on an existing rate, or click the New
button to create a new billing rate.
- To include markup in your labor billing, you can use
a fixed Dollar Rate for the billing that is higher
than your labor costs, or you can add a percentage
to the wage rate, or the net labor cost including
burden.
- After you have set up the billing rate, click OK.

After you have set up the billing rate,
assign it to the labor hours on the project. To do that,
follow these steps:
- Choose Labor
Hours from the Costs menu.
- Click the New button.
- Enter the employee doing the work, and
the number of hours.
- Click on the Job Type popup field, and
choose Projects.
- Click on the Job clairvoyant field, and
enter the T&M project.
- Hit the More Info button, and fill in the T&M Billing Rate.
- Click OK.
- Hit the Enter key to save the record.
- The hours will be included as a line item
in the next T&M billing.
Line Item Costs
If your contract allows it, you may be able to bill
for some overhead costs as actual costs, when working on
a Time & Materials project. For example, any of the
following might be considered as billable "project
overhead":
- Time spent on blueprints and plans
- Printing costs for blueprints and plans
- Time spent preparing estimates for the work
- Time spent meeting with the clients
- Time spent ordering materials for the project
- Time spent writing payroll for the project
HINT-- Your T&M contracts should probably specify
exactly what types of overhead expenses can be billed, and
which are covered by the markup.
To include labor as billable project overhead, follow
these steps:
- Choose Labor
Hours from the Costs menu.
- Click the New button.
- Enter the employee doing the work, and the number of hours.
- Click on the Job Type popup field, and choose Projects.
- Click on the Job clairvoyant field, and enter the T&M project.
- Hit the Enter key to save the record.
- The hours will be included as a line item in the next T&M
billing.
Fixed Charge
If you charge a fixed-price markup, management fee,
or overhead allowance that is not based on actual work costs,
follow these steps:
- Choose Billing
Records from the Bank menu.
- Click the New button.
- Enter Project into the Account Type popup field.
- Enter the T&M project into the Account clairvoyant field.
- Enter Misc. Charge into the Billing Type popup field.
- Enter the amount of the charge into
the Gross Price field.
- Hit the Enter key to save the record.
You can then print the Billing Record and submit it
to the client. Use the Deposit Funds command to credit the
payment, along with payments for the regular T&M bill.
Click here to return to Project
Management topics. 
Topics
| Previous | Next | Getting Started Manual | Reference
Manual | Site Map | Website
|


