|
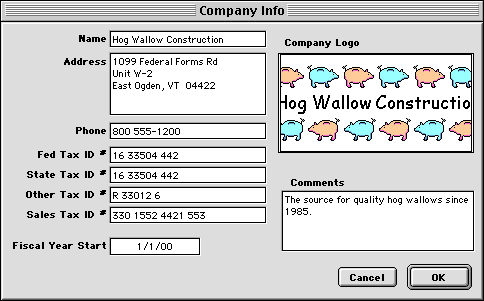
The Company Info window lets you set basic information about your company.
COMPANY INFO BASICS
Entering Info | Data Fields | Adding A Logo | Using
Company Info | Using Company Logo
Website Info Links
Accounting Software | Business
Management Software
RELATED TOPICS
Custom Layouts | Preferences | Printed Forms | Reports
Entering Info
To enter basic company information, follow these steps:
- Choose Company Info from the File menu. You'll see the Company Info window.
- Enter your company info.
- Click OK.
Data Fields
Enter info into the following fields:
Name-- Enter your company name, as you'd like it to appear on printed forms.
Address-- Enter your company address.
Phone-- Enter your phone number(s).
Tax ID Numbers-- Enter your tax ID numbers.
Fiscal Year Start-- Enter the start of your company's fiscal year. HINT-- It doesn't matter
which year you enter-- Goldenseal will always use the same day and month in the proper year.
Comments-- Enter any comments you have about your company.
Adding A Logo
Goldenseal lets you store a graphic image of your company logo, so it's
easy to include in printed forms or reports with the Custom
Layouts command.
To add a company logo, follow these steps:
- Create your company logo in any graphics program.
- While in the graphics program, select the graphic, then choose Copy from the Edit menu.
- Switch to Goldenseal.
- Choose Company Info from the File menu.
- Click in the Company Logo field.
- Choose Paste from the Edit menu (Mac) or right-click and choose Paste from the popup menu (Windows).
On the Macintosh, you can paste in any graphics that are in PICT
format. That includes "MacPaint" style bitmap images, and "MacDraw" style
drawings.
HINT-- Many graphics programs support
the PICT format. If you want to use graphics that are not PICT, use
a graphics utility such as GifMover to convert it to PICT.
In Windows, you can paste in bitmap images that are in .bmp, .jpg, .gif, .tiff or .psd (Photoshop) formats. Goldenseal
will also convert most other graphic formats so they'll work for the logo.
Using Company Info
You can include your company name, address, phone and tax ID number on
reports or printed forms.
To do so, follow these steps:
- Choose Custom Layouts from the Options menu, and choose Printed Forms from the submenu.
- Switch to the form where you'd like to include company info.
- Click on the Calculator Tool.
- Click and drag on the form at the location where you'd like to add company info.
- You'll see a calculator dialog. Switch to the Company Info calculators.
- Choose the item you'd like to add to the form, then click OK.
HINT-- If you ever decide to change your address or logo in the future, you'll only need to make the change in the Company
Info window. All forms and reports will automatically be updated.
Using Company Logo
Goldenseal already includes the company logo on many printed forms. When
you paste in a new logo, it automatically appears on all the forms.
To include the company logo on your own forms or reports, use the Custom Layouts command to open the layout, and then use
the Add Logo command to add the logo.

Main Page | Accounts |
Lists | Transactions | Menus |
Index | Website | User Page
|


