|
This section covers a few setup details for Goldenseal
accounting software.
Owner Equity
To set up ownership shares in Goldenseal, follow these steps:
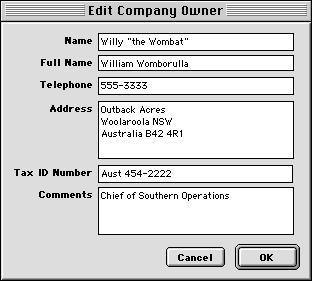
- Choose Other Lists from the Options menu, then choose Owners from the submenu.
- Select an existing owner and click Edit, or click the New button.
- Enter information about the owner (a person, partnership or corporation).
- Click OK.
- Repeat steps 2 to 4 for each owner. When you are finished, click the Done button.

To allocate ownership shares, follow these steps:
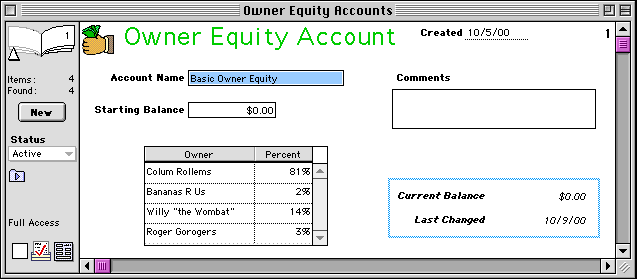
- Choose Liability Accounts from the Accounts menu, then choose Owner Equity
from the submenu.
- Click the New button.
- Enter the first owner into the first row of the Owner breakdown table. Also enter their percentage of
ownership.
- Press the Return key, and enter the next owner and their percentage.
- Repeat step 4 until all owners are entered.
- If you use more than one way to divide profits or ownership, click the New button, and repeat steps 3 to
5.

NOTE: Goldenseal currently does not track equity for multiple owners,
but that feature will be added in a later upgrade.
Overhead Accounts
Goldenseal uses overhead accounts to track indirect costs. When you create
a company file, it starts out with a single overhead account.
If your overhead is relatively simple, one overhead account is probably enough,
since you can use cost categories and cost locations to group costs.
HINT: You can also assign overhead costs to a specific customer,
project, real estate or equipment account if the cost applies to just one job.
You may want to create more overhead accounts if you have more than one sales
branch or company division, or if you do more than one type of work.
To create a new overhead account, follow these steps:
- Choose Overhead from
the Accounts menu.
- Click the New button.
- Enter information about the new account.
- If you would like the overhead costs from this account to be distributed among other overhead accounts,
turn on the Distribute to Other Accounts checkbox, and enter the accounts and percentage
for each (the percentages must add up to 100%).

NOTE: Goldenseal will not actually distribute overhead costs
to other accounts, but that feature will be added in a future upgrade.
Using Multiple Overhead Accounts
To enter overhead expenses, follow these steps:
- Choose Equipment Hours, Labor Hours, Material Purchases, Subcontractor Costs
or Other Costs from the Costs menu (depending on the type of expense you are
entering).
- Click the New button.
- Enter details for the expense.
- Enter Overhead into the Job Class popup menu.
- Enter an overhead account into the Job field.
Where to Start with Goldenseal
Once you have set up accounts and lists, you can start entering business transactions
into Goldenseal.
You skip any parts of Goldenseal that don't apply to your business, and
you can start with whatever is most convenient or most urgent.
The following sections describe the most convenient way to start with each
part of MacNail.
Expenses
A good way to start entering expenses into Goldenseal is as follows:
- Set up cost accounts-- equipment, material, subcontractor and other
cost accounts.
- Set up the bank accounts that you use to pay for expenses.
- If you want to track job costs right away, set up job accounts (customers,
overhead and projects) and cost categories.
- Enter lists-- vendor sales tax and vendor payment terms.
- Start entering expense transactions-- equipment hours, material purchases,
subcontractor bills and other cost transactions.
- Use the Pay Bills command to pay vendor bills, as they come due.
Payroll
A good way to start entering payroll costs into Goldenseal is as follows:
- Set up employee accounts.
- Enter lists-- wage rates, tax items, tax packages, benefit items, benefit
packages, and other items under the Payroll Setup command.
- Set up the bank accounts that you use for writing paychecks.
- If you want to track job costs right away, set up job accounts (customers,
overhead and projects) and cost categories.
- Enter employee hours.
- Use the Write Payroll command to handle payroll.
Projects
A good way to start entering project data into Goldenseal is as follows:
- Set up customer accounts for the people paying for project work.
- Set up an estimate for each project that has a budget.
- Set up project accounts.
- Enter lists-- project payment terms, draw schedules, and other choices
under the Income Setup command.
- If you want to track job costs or do time and materials billing, set up
cost accounts (equipment, material, subcontractor and other cost) and cost categories,
and then start entering expenses and labor hours (see the previous two sections).
- To make draw schedule or progress payment bills, use the Billing commands.
- To track project logistics, enter Project Log, Punch List, Change Orders,
Appointment, and Transmittal records.
Sales
A good way to start entering sale data into Goldenseal is as follows:
- Set up customer accounts for each of your customers.
- Enter lists-- job sales tax, delivery methods, discounts, customer payment
terms, and other choices under the Income Setup command.
- Start entering sales.
- Use the Deposit Funds command to deposit sales income.
Rentals
A good way to start entering rental data into Goldenseal is as follows:
- Set up customer accounts for each of your tenants.
- Set up Real Estate accounts for each of your properties.
- Enter rental payment terms.
- Create Lease transactions for each tenant.
- Start entering Rental Transactions.
When To Start with Goldenseal
You can start using Goldenseal at any time.
Starting Date
Pick a day when you will officially start using Goldenseal.
You may want to start at the beginning of a year, quarter or month, but there
is no requirement that you do so.
Starting Balances
Enter your best estimate of the starting balance for each bank account-- the
amount that is in the account on the day when you start using Goldenseal.
When you get your next bank statement, you can reconcile the account, and adjust
the starting balance or 'trial balance' if needed.
Prior Job Costs
If you have projects underway when you start using Goldenseal, you can enter
prior job cost information for them. That allows you to get a more accurate picture of the total project
cost.
To include prior expenses, enter them into expense transactions (Equipment
Log, Labor Log, Purchases, Subcontractor Bills, Other Costs). Use Job Cost Only as a status. Goldenseal will
use the cost information for job costing, but it will not affect Accounts Payable.
HINT: You can enter estimated costs, if you don't know the
exact amounts.
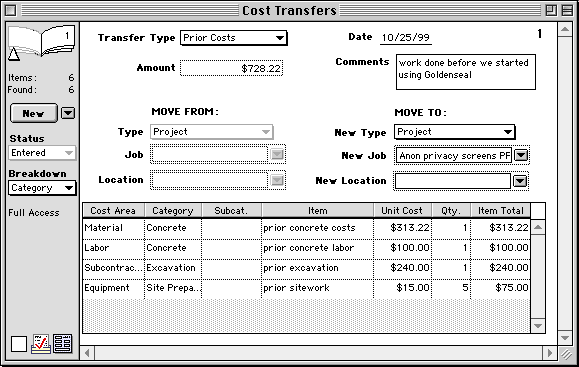
You can also use a Cost Transfer to enter costs that you have already spent
on a project. To do so, follow these steps:
- Choose Special Transfers from the Accounts menu, then choose Cost Transfers
from the submenu.
- Click the New button.
- Enter Prior Costs into the Transfer Type popup menu.
- Enter the project into the Move To fields.
- To enter multiple costs at one time, enter Category into the Breakdown popup
menu (or enter Items if you want to enter specific cost items).
- Enter specific costs into the breakdown table.

Prior Project Income
To include prior project income, enter payments amounts into Bank Deposit transactions,
and use Job Cost Only as a status. Goldenseal will credit the income to the job, but it won't affect
the account balance.
Mid-Year Payroll
When you start in the middle of the year, there are three ways to handle payroll-- you
can go back and enter all payroll hours starting at the first of the year, you can 'cheat' and
enter year-to-date totals directly into a single record, or you can just start at mid-year and ignore year-to-date
amounts.
Getting Started
Before you enter previous payroll, follow these steps so you can change payroll
withholding amounts to match what you actually deducted:
- Choose Preferences from the Options menu, and choose Expenses from the submenu.
- Turn on the Allow Payroll Deduction Changes checkbox.
- Click OK.
Entering All Hours
The most accurate way to start payroll in mid-year is to enter information
right from the first of the year. That will also give you more accurate job cost information.
To do so, follow these steps:
- Set up payroll deductions, wage rates and other payroll information for
each employee (see Lesson 45). If an employee's status changed during the year,
start out with their setup from the first of the year.
- Choose Labor Hours from the Costs menu.
- Click the New button, and enter hours from the first pay period for each
employee. HINT: You may need to create several records, if the employee
worked on more than one job during the pay period.
- Choose Write Payroll from the Bank menu.
Goldenseal will show you the computed wages and deductions
(see Lesson 46).
They may not match your previous withholding, but
for now you can ignore any differences.
- Click the Write Payroll button. Don't enter a bank account, so Goldenseal
will skip the actual paychecks.
- Goldenseal will create a payroll record for each employee.
- In the payroll record, choose Wages from the Breakdown popup menu. You can
adjust overtime hours if needed.
- Choose Deductions from the Breakdown popup menu. If you used the 'lookup
tables' in the tax table, you'll probably need to change the withholding amounts.
Click in the Amount column and type in the amount you actually withheld.
- Repeat step 8 for employer taxes, category taxes and benefits.
- Repeat steps 7 to 9 for each employee.
- Repeat steps 2 to 10 for each pay period.
NOTE: If any taxes or wage rates changed during the year, make
the change when you get to the appropriate pay period.
Entering Combined Year-To-Date Amounts
A quicker way to enter mid-year payroll is to put all year-to-date totals into
a single payroll record.
To do so, follow these steps:
- Set up payroll deductions, wage rates and other payroll information for
each employee (see Lesson 28).
- Create a Labor Hours record for each employee. Enter the total number of
hours they worked-- starting in the first pay period with a payday in the current
year, and ending in the last pay period before you start using Goldenseal. If the employee worked at more
than one wage
rate, enter multiple records, and enter the hours they worked at each rate.
- Choose Payroll Records from the Costs menu.
- Click the New button.
- Enter an employee into the Employee field.
- Choose YTD Only from the Status popup menu.
- Choose Wages from the Breakdown popup menu. Goldenseal will show you the
year-to-date gross wages for the employee.
- Adjust the overtime amount so the total wages are correct.
- Choose Deductions from the Breakdown popup menu. You'll see a list
of employee withholding items.
- If the calculated deductions are not correct, enter the correct year-to-date
figures for each deduction into the Amount column. HINT: It's normal for most taxes to
be calculated incorrectly when you do a whole year at once, since the wage brackets are thrown off when
you
combine pay periods.
- Choose Employer Taxes from the Breakdown popup menu, and fill in year-to-date
figures for employer taxes.
- If you calculate some taxes based on the work being done, choose Category
Taxes from the Breakdown popup menu and fill in year-to-date amounts.
- Choose Benefits from the Breakdown popup menu and fill in year-to-date
amounts.
- Repeat steps 4 to 13 for each employee.
Ignoring Payroll Year-To-Date
The easiest way to start payroll in mid-year is to just start, and ignore year-to-date
totals. You may want to consider doing that if you are starting very late in the year.
To do so, follow these steps:
- Set up the current payroll deductions, wage rates and other payroll information
for each employee (see Lesson 28)
- Choose Labor Hours from the Costs menu.
- Click the New button, and enter hours for the current pay period for each
employee (see Lesson 29).
- Choose Write Payroll from the Bank menu.
Check the figures, and then click the Write Payroll
button to create
payroll records.
- If there is withholding or employer taxes that 'cut off' at a
certain amount, you'll need to adjust the deduction amounts if they are currently
over the limit.
Start | Previous | Next | Directory | Index | Ref
Manual | Website
|


