|
 |
|
|
||||
Lesson 46-- Writing Payroll |
|||||
|
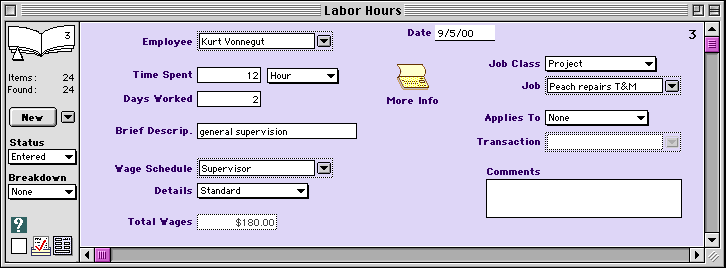
After you have set up for payroll, you'll enter employee hours and then write payroll each pay period. The Goldenseal payroll software program does all the calculations, so all you need to do is data entry and a bit of double-checking for special situations. HINT: As a bonus, Goldenseal uses the same labor information to compute job costs and time and materials billing. Before you do payroll, enter labor hours records for the work done by each of your employees. Labor hours records are similar to the other expense transactions covered in Lessons 33 to 35. To enter hours, follow these steps:
Applies To Use the Applies To field to assign labor to an allowance or change order, so this work will be included in the billing amount for them. You can also assign labor to a bid or work order. You can also use the Hours Reduction option to subtract these hours from the employee's pay. Use it if you entered too many hours in a previous labor hours record that has been closed and can't be changed. HINT: To correct a labor hours record that has not been closed, simply enter a different amount in the Time Spent field. Labor Breakdowns Use breakdowns to enter more than one piece of work into a labor hours record. To assign job costs to specific cost items, choose Item in the Breakdown field. To assign work to more than one cost category without using cost items, choose Category in the Breakdown field. If you pay an employee more than one wage rate during a pay period, follow these steps:
Enter hours for salaried employees, partners, unpaid workers and owners, just as you do for hourly employees. It will increase the accuracy of your job costs if you keep track of their time and assign it to jobs. When you run payroll, Goldenseal will adjust the wage rate so salaried employees get their usual salary amount. For employees or owners that get an irregular draw, you can type in whatever the draw amount is for that period. You can also write a check directly to owners, if their draw is not handled as a part of payroll. Use the Details field to set overtime conditions (and a few other things). At the Standard rate, Goldenseal automatically applies the overtime rate to the excess when there are more than eight hours per day or more than 40 hours in a weekly pay period. NOTE: If you use overtime cutoff amounts that are different from 8 hours per day or 40 hours per week, change the cutoff amounts in each wage schedule. If you do not want overtime to be assigned to a labor hours record, choose No Overtime in the Details field. To pay all the hours at the standard overtime rate, choose Overtime Rate. To pay all the hours in a record at the Saturday or Sunday overtime rate, choose Saturday Rate or Sunday Rate in the Details field. NOTES: To set the overtime rates, choose Payroll Setup from the Costs menu, and choose Wage Rates from the submenu. You can also adjust overtime hours when you write payroll (see the next section). If the employee is doing work that will not be paid now, choose Add To Comp Time in the Details field. The hours will be job costed, and added to the employee's comp time balance instead of being paid now. If prior comp time is being paid now, choose Use Comp Time in the Details field. The work will be paid now, but not job costed. When employees use paid holiday or vacation time, enter the hours as usual, and enter Paid Holiday or Paid Vacation into the Overtime field. You can assign the holiday cost to an overhead account, or to a specific job. If you forget to pay employees for a paid holiday, Goldenseal will remind you about it when you write payroll for that pay period. Goldenseal automatically accrues vacation time in each pay period. Time and Materials Billing and Job Costs The way Goldenseal calculates labor costs for time and materials billing and job costs depends on the calculation method in the labor billing rates that you assign to each employee account and labor hours record (see page 329). If the billing rate uses a fixed rate or the Pay Rate option, the total cost of labor is calculated as soon as you enter a labor hours record. If the billing rate uses the Net Cost option, the actual cost of labor is not calculated until after payroll is completed (see the next pages). After you write payroll, Goldenseal automatically adds 'burden' to the billing amounts. Burden includes the cost of taxes, insurance and benefits that are paid by the employer. NOTE: Before you write payroll, Goldenseal temporarily uses the Pay Rate calculation amount for billing and job costs. If you need to do time and materials billing before you write payroll, don't use the Pay Rate calculation option in the labor billing rate. Instead, use a flat rate, or use the Pay Rate plus Percent option and add a percentage to cover approximate employer burden (and overhead costs, if desired). HINT: The Net Cost option is more accurate, since it uses actual payroll costs. Once you have entered employee hours, follow these steps to write payroll:
Viewing Hours Worked To see an itemized list of the hours that an employee has worked, follow these steps:
Viewing Deductions To see a list of tax deductions, double-click in the Deduction column in the employee's row.
You can also see category taxes, benefits, employer taxes or accrued vacation for this pay period. Simply double-click in the appropriate column. Changing Pay Periods The Goldenseal software starts out with the earliest pay period that contains unpaid labor hours. Use the Pay Period popup menu to change to a different pay period. You can enter the current pay period, any of the three previous periods, or the next pay period. You can also view all labor hours, or you can enter a custom date range. After you change to a different pay period, Goldenseal automatically adjusts the Start Date and End Date fields and fills in the appropriate labor hours. The Goldenseal software starts by including all employee hours in the payroll report, even if you used more than one wage schedule. NOTE: If you use more than one pay interval (for example, weekly and biweekly), you'll only see labor for one payroll interval at a time. To see the work done under just one wage schedule, enter a wage schedule into the Wage Schedule field. The Wage Schedule field is useful if you have a mixture of salaried and hourly employees, or if you write separate paychecks for different types of work. To write payroll for just one wage schedule, follow these steps:
When you are ready to create paychecks for this period, follow these steps:
HINT: If you don't want to create paychecks right away, leave the Account field empty. You'll still get payroll records for the period. The Goldenseal software keeps details of each payroll payment in a Payroll Record. The record contains several breakdowns that show the hours paid, employee withholding amounts, employer taxes and benefits. To view payroll records that have already been created with the Write Payroll command, follow these steps:
Direct Entry of Payroll Records To create a payroll record that calculates wages and deductions for a single employee, follow these steps:
HINT: If you need control over the pay period or the wage rates that are included, use the Write Payroll command. You can also use simple payroll records to handle bonuses, pay adjustments, vacation changes and tax payments. You can also use simple payroll records to enter payroll if you are entering past paychecks, if you figure payroll deductions manually, or if you use a payroll service but write your own paychecks. To enter a payroll adjustment, follow these steps:
Printing Paychecks and Paycheck Stubs After you create paychecks, you can print them onto check blanks, with a detailed breakdown of wages, benefits and withholding. To do so, follow these steps:
You can also print payroll records to give a breakdown of payroll deductions, which you can use as an attachment when you don't print checks (or when you print on checks that don't have room to show wages, benefits and withholding). To do so, follow these steps:
Goldenseal automatically keeps track of the accrued balance of vacations, sick time and comp time for each employee. To view the current balance for an employee, choose Employees from the Accounts menu, and find the employee record. HINT: Goldenseal automatically accrues vacation time during each pay period. To adjust the balance, make a Payroll Record. If an employee gets a paid holiday, Goldenseal will remind you to create a Labor Hours record for the holiday pay, if you haven't already done that when you use the Write Payroll command for that pay period. To see a report of employee hours, choose Payroll from the Reports menu, and choose Employee Hours from the submenu. Enter a date range, and click the Update button. You'll see a list of Labor Hours records, grouped by employees.
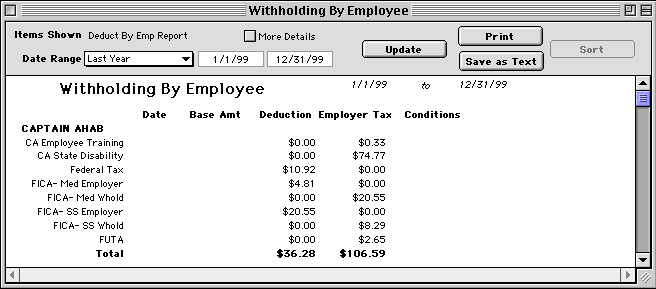
To see employee withholding, choose Payroll from the Reports menu, and choose Withholding by Employee from the submenu. Enter a date range, and click the Update button. HINT-- Goldenseal automatically handles payments of tax withholding (see Lesson 48).
The withholding report shows totals for each Tax Item for each employee. To see an itemized list of withholdings, follow these steps:
To see a similar report listing totals for each tax, choose Payroll from the Reports menu, and choose Withholding by Tax Item from the submenu. For more about reports, see Lesson 20. This lesson has shown you how to use the Goldenseal payroll software to write payroll each week. Now that you've finished the easy part of payroll, you may feel ready to re-hire the employees that you fired after the last lesson. Of course by now they may have discovered the lucrative business of selling chic hats on the Internet, and they may not want to come back. HINT: Check out our optional Internet Chic Hat Sales Module (ICHSM) if you want to join your ex-employees in the lucrative business of selling chic hats on the Internet. Start | Previous | Next | Directory | Index | Ref Manual | Website |