|
 |
|
|
||||
Lesson 11-- Cost Categories |
|||||
|
Every business needs a convenient way to track expenses and income (often called job costing or job cost accounting). The Goldenseal job costing software includes a flexible system of cost categories to do that. In this lesson you'll create a new cost category, and add it to a category system. HINT: Goldenseal also includes traditional expense and revenue accounts. However you will probably find that you don't need to use them directly, since cost categories are a more convenient and accurate way to organize your expenses. How Cost Categories Will Help You A system of cost categories will do all of the following for you:
Category Setup Goldenseal includes Cost Categories, which are a simple list that you can use to classify expenses. It also includes optional category systems, which group categories into main categories and subcategories. Use category systems in any of the following cases:
To set up Goldenseal so it uses category systems, follow these steps:
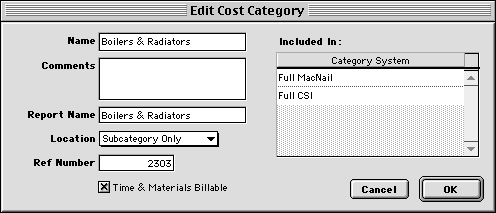
NOTE: If you turn off the Use Category Systems checkbox, Goldenseal will not use category systems. In that case you can always use any cost category, and subcategories will never be used. If you have a construction or service business, you'll probably need at least two different category systems-- one for the work you do, and one for your general overhead expenses. For other types of business, one category system may be sufficient. Whether you use subcategories is a matter of personal preference (they take more data entry time, but give you more useful cost information). HINT: Some people set up two category systems-- one that includes subcategories and one that doesn't. Then you can use different levels of job cost detail for different projects. If you aren't sure which categories to use, start with a simple system that includes whatever seems obvious at first. You can always add new categories as you think of them later on. HINT: The Starter Files include pre-set category systems for several business types. You may be able to use one of them as a starting point, when you set up a cost category system for your company. Cost Categories You'll use cost categories in most parts of Goldenseal-- they are a central part of our job cost accounting software. There is a category field in all expense transactions (see Lessons 33 and 35). If you use a category or item breakdown, each breakdown item has a category (see Lesson 34). Allowances, bids, change orders and estimates are also itemized by category (see Lessons 3 and 6), as are direct bank purchases and sales that use a category or item breakdown. Cost Items and Assemblies also include a cost category (see Lessons 13 and 14). When you use them in an Item breakdown, you won't have to look through hundreds or thousands of items-- you'll only see the items that belong to one category. The Sample Company file already includes a set of cost categories for a construction company. To add a new cost category, follow these steps:
Category systems allow you to create a 'two layer' system of cost categories with main categories, and smaller subcategories. To add a new category to a category system, follow these steps:
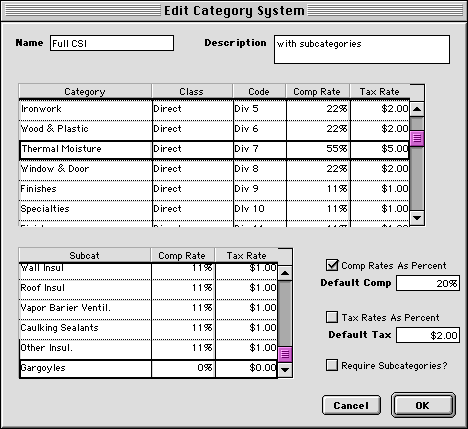
Creating a New Category System To create a completely new category system, follow these steps:
Using Category Systems Assign a category system to each project account, overhead account, cost account, cost item, job type, sales branch and estimate. Each time you enter an expense transaction, the Category field will show a list of categories from the category system that was assigned to the supplier account, job account or sales branch (the choice depends on which makes most sense for that type of transaction). HINT: If no category system is selected, you will see all categories in the Category field. The Subcategory field shows subcategories only if the current category system includes subcategories. For progress payment billing, you can use the category system from the estimate to track percentage of completion. For any project, use the Job Costs command to see a cost breakdown by category. You can also use category breakdowns in many reports (see Lesson 20). Switching Category Systems To enter a category from a different category system, follow these steps:
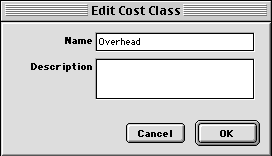
Cost Classes You can group cost categories into larger classes. To enter a new cost class, follow these steps:
To assign a cost category to a cost class, use a Category System (see the previous section). When you make job cost reports, you have the option to see a breakdown by cost class, or by cost class and category. More Goldenseal Groups Goldenseal provides several additional ways to mark business transactions and then categorize them in reports:
Finishing Up This Lesson has covered cost categories. It may take you a while to set up a full system of categories for your business, but you only have to do it once! You might want to take a break now and consider how many group words there are, and how many of them we must use in the Goldenseal job cost accounting software-- category, list, type, class, assembly, phase, gaggle, covey, flock... Aaaaaagh. Wouldn't you like to be part of a group/class/type yourself? The Turtle Creek Software Users Chic Hat User Group might be just the thing. Send us a picture of your most chic hat, and we'll post it on our bulletin board for the enjoyment of all. We'll also send you a handsome laser-printed certificate of appreciation. In fact if you send us the chic hat itself, you can be sure it will be worn with great pride by the bronze gargoyle in our employee washroom. Start | Previous | Next | Directory | Index | Ref Manual | Website |