|
Use Checking Accounts for bank accounts that have sequential checks.
HINT-- Checking accounts are usually the busiest accounts in the Goldenseal accounting software.
CHECKING ACCOUNT DATA
When
to Use Checking Accounts | Creating Checking Accounts | Data Fields | Calculated
Fields
Checkbooks | Current Balance | Minimum
Balance | Starting Balance | Status Field
USING CHECKING ACCOUNTS
Depositing Funds | Paying Bills | Checking Transactions | Using
Checking Accounts
CHECKING ACCOUNT RECORDS
Entering Records | Changing Records | Deleting
Records | Voiding Records
Finding Records | Sorting Records | Fixing Mistakes
Website Info Links
Accounting Software | Business
Management Software
| Check Printing Software | Check Writing Software
RELATED TOPICS
Bank Checks | Bank Deposits | Bank Payments | Bank
Transactions | Bank Transfers
Cash Accounts | Escrow Accounts | Investment Accounts | Savings
Accounts
When to Use Checking Accounts
Use a Checking account for business or personal checking accounts, when
you can write sequential checks against the account.
NOTE-- If the money in the account does
not belong to you, use an escrow account instead.
Also use Checking accounts for share draft accounts, or investment accounts where you can sometimes write sequential checks from the account.
NOTE-- If you can't write sequential checks at all, use an investment account or
a savings account instead.
Set up a separate Checking account for each bank account that has its own statement balance.
NOTE-- If you have a "consolidated" account that combines several bank accounts, set up a separate account for each item
that has its own balance amount within the master account.
Checking accounts are usually your busiest accounts. You'll use them to pay bills, as well as to process most of the company income.
Creating Checking Accounts
To create a new Checking account, follow these steps:
- Choose Checking from the Accounts menu.
- Choose New Record from the Edit menu, or click the New button.
- Fill out information about the account.
 QUICK
SETUP HINT-- You only need to enter an Account Name. If you write
checks, enter checkbooks and the next check number. For accurate
reconciling, enter a Starting Balance. QUICK
SETUP HINT-- You only need to enter an Account Name. If you write
checks, enter checkbooks and the next check number. For accurate
reconciling, enter a Starting Balance.
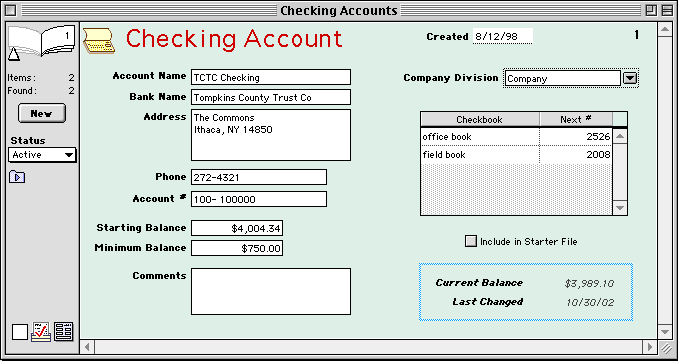
Data Fields Enter the following information for each Checking account:
Account Name-- Enter a short name for the account. This is the
text that will appear in the Chart of Accounts and in pop-up menus.
Bank Name-- Enter the name of the bank where the account is
located.
Address-- Enter the address of the bank.
Phone-- Enter the bank's phone number.
Account Number-- Enter the checking account number.
Comments-- Enter any comments you'd like to make about this account. You may want to enter key words to make it easier to locate or group particular
accounts.
Starting Balance-- Enter the Starting
Balance for the account-- the amount of money in the account when you
first started using Goldenseal.
Minimum Balance-- If you want to keep a Minimum
Balance in the account, enter it here. If you have overdraft protection,
enter a negative number.
Creation Date-- When you create an account, today's date will
be entered automatically. You can change this date if desired.
Record Number-- An account record number will automatically
be assigned.
Company Division-- Use the clairvoyant field to enter the Company
Division to which this account belongs.
Checkbooks-- Enter each separate checkbook that draws on this account, with the next check number for each.
NOTE-- When you write checks, Goldenseal
will automatically increase the next check number for the checkbook that
you use.
Calculated Fields
Goldenseal shows the following calculated values for this account:
Current Balance-- The current balance is the most recent running total, after all bank transactions are included.
Last Changed-- Goldenseal shows the date of the most recent change in this account.
Status Field
Enter the current status of this account:
Active-- You currently do business with this account.
Inactive-- You don't currently do business with this account, but you may in the future.
Closed-- You definitely don't do business with this account any more.
Using Checkbooks
Checkbooks allow you to set up one or more sequences of check numbers in
a checking account.
For example, you will enter multiple checkbooks if you have one checkbook in your office, and you also write checks from a different number series when
you are outside the office.
To add a new checkbook to a checking account, follow these steps:
- Choose Checking from the Accounts menu.
- Find the account you'd like to change.
- Click anywhere in the last checkbook row in the checkbook table (at the right side of the window).
- If you don't have a checkbook yet, skip to the next step. Otherwise press the Return key.
- Enter a new checkbook name, and the next available check number for that checkbook.
To change the next number for a checkbook, click in the Next # cell and
type in a new number.
HINT-- You may need to change the check number if you start a new check sequence, void a check, or otherwise get a mismatch
between the computer records and your actual checkbook.
To use a specific checkbook when you enter a Checking Transaction, choose a checkbook from the Checkbook popup menu.
Checking Transactions
To move money into or out of a Checking account, use a Checking Transaction.
To create a Checking Transaction, follow these steps:
- Choose Checking Transactions from the Bank menu, and choose an account from the submenu.
- Click the New Button, or choose New Record from the Edit menu.
- Click on the Type popup at top center, and select a Bank Check, Payment, Deposit, Transfer
In or Transfer Out.
- Enter other details for the bank transaction.
Using Checking Accounts
Use Checking Transactions to handle the money that
goes in and out of your checking accounts.
When you make purchases and pay by check, enter an instant purchase to automatically deduct the money from
a Cash account.
Use the Pay Bills command to write checks for vendor invoices.
To see a record of checking account income and outgo, choose Banking from the Reports menu, and choose Checking Transactions
from the submenu.
To reconcile the account against your bank statement, choose Reconcile from the Accounts menu.
To find a specific check, open the Checking Transactions and use the Find command.
The value of your Checking accounts automatically shows up as an asset on your balance sheet. To see it, choose Financials from the Reports menu,
and choose Balance Sheet from the submenu.

Main Page | Accounts |
Lists | Transactions | Menus |
Index | Website | User Page
|


